intermezzOS

An operating system for learning
Preface
This book describes the intermezzOS project. intermezzOS is a hobby operating system, specifically targeted at showing beginners how to get into operating systems development. Rather than describe some sort of final OS, it instead proceeds in a tutorial-like fashion, allowing you to implement intermezzOS yourself, alongside the book.
The book assumes that you have programmed in some language before, but not any particular one. In fact, people who have not done low-level programming before are a specific target of this book; I’ll be explaining a lot of things that other resources will just assume that you know.
intermezzOS is implemented in Rust, and some assembly code. We’ll try to explain Rust along the way, but may refer you to its documentation when things get tricky. This book isn’t really about learning Rust, but you might accidentally along the way.
You can find all of this stuff on GitHub.
This book is in the book repository, the kernel is in kernel, and the
website is there too. Feel free to open issues if you want to discuss things
in a general sense, and send bug reports and PRs to the appropriate repos if
you’d like to help with a particular component.
The Story
A long time ago, in college, my friends and I were working on a hobby operating system, XOmB. It was... tough. Frankly, while I learned a lot, I was a pretty minor contributor. I got frustrated too easily. One day, I found Ruby, and I was pretty much done with low-level programming. I had done it most of my life, and I was bored. Bored, and sick of dealing with core dumps.
Those details aren’t that important. What is important is that over the years, I’ve always wanted to get back into this stuff. But the problem is this: there are a lot of people who do hobby operating system work, but... I don’t like their attitudes.
You see, a lot of people see low-level programming as some kind of superior, only-for-the-smartest kind of thing. They have a puritanical world-view: “I suffered to learn this, so you too must suffer to build character.” I think that’s short sighted. Low level programming is difficult to get into, but that says more about the teachers’ faults than the students’.
Anyway, as my professional life has moved back towards the low level, I’ve been thinking about this topic a lot again. That’s when I found an awesome link: Writing an OS in Rust by Philipp Oppermann. I cannot speak enough about how awesome Phil’s tutorial is; it single-handedly inspired me to get back into operating systems.
The big difference with Phil’s tutorial is that it doesn’t treat you as being stupid for not knowing ‘the basics’. It doesn’t say “spend hours debugging this thing, because I did.” It doesn’t insult you for being new. It just explains the basics of a kernel.
It’s amazing how much a little bit of a framing can completely change the way you see something. When the examples I found were all about how you have to be an amazing rockstar ninja and we won’t give you all the code because you suck if you can’t figure it out, I hated this stuff. When it was kind, understanding, and helpful, I couldn’t get enough.
Once I got to a certain part in Phil’s tutorial, I started implementing stuff myself. A lot of the initial code here is going to be similar to Phil’s. But I’m going to write about it anyway. There’s a good reason for that:
Writing is nature’s way of showing us how sloppy our thinking is.
- Leslie Lamport
By re-explaining things in my own words, I hope to understand it even better. This is just a perpetual theme with me: I like teaching because it helps me learn. I like writing because it helps me understand.
We'll be using a tool Phil developed called bootimage, and we'll explain
similar concepts, but with different code and in different ways, and in a
different order.
Furthermore, I will not commit to any kind of schedule for this project. It’s going to be in my spare time, and I’m learning a lot of this as I go, too.
The Name
The nomad has a territory; he follows customary paths; he goes from one point to another; he is not ignorant of points (water points, dwelling points, assembly points, etc.). But the question is what in nomad life is a principle and what is only a consequence. To begin with, although the points determine paths, they are strictly subordinated to the paths they determine, the reverse happens with the sedentary. The water point is reached only in order to be left behind; every point is a relay and exists only as a relay. A path is always between two points, but the in-between has taken on all the consistency and enjoys both an autonomy and a direction of its own. The life of the nomad is the intermezzo.
Deleuze and Guattari, “A Thousand Plateaus”, p380
If you’re not into particular kinds of philosophy, this quote won’t mean a lot. Let’s look at the dictionary definition:
An intermezzo, in the most general sense, is a composition which fits between other musical or dramatic entities, such as acts of a play or movements of a larger musical work.
I want this project to be about learning. Learning is often referred to as a journey. You start off in ignorance and end in knowledge. In other words, ‘learning’ is that part in the middle, the in-between state.
The tricky thing about learning is, you never stop learning. Once you learn something, there’s something new to learn, and you’re on a journey again.
If you want to learn a lot, then you’ll find yourself perpetually in the middle.
There is another sense by which this name makes sense: as we’ll learn in the beginning of the book, operating systems are largely about abstractions. And abstractions are themselves ‘in the middle’, between what they’re abstracting and who they are abstracting it for.
Principles
Here are the guiding principles of intermezzOS:
- We’re all actual people. Please treat each other as such.
- We’re all here to learn. Let’s help each other learn, rather than being some kind of vanguard of knowledge.
- The only thing that matters about your language background is the amount you may have to learn.
- Everything must be documented, or it’s not done.
And of course, everything related to this project is under the Code of Conduct.
Background
Before we get going, we should probably have some idea of where we’re headed.
What is an OS?
It’s actually kind of difficult to define what an operating system is. There are a lot of different kinds of operating systems, and they all do different kinds of things.
Some things are commonly bundled with operating systems, but are arguably not part of the essence of what makes an OS an OS. For example, many operating systems are often marketed as coming equipped with a web browser or email client. Are web browsers and email clients essential to operating systems? Many would argue the answer is no.
There are some shared goals we can find among all operating systems, however. Let’s try this out as a working definition:
An operating system is a program that provides a platform for other programs. It provides two things to these programs: abstractions and isolation.
This is good enough for now. Let’s consider this a test for inclusion, but not exclusion. In other words, things that fit this definition are operating systems, but things that don’t may or may not be, we don’t quite know.
Creating abstractions
There are many reasons to create a platform for other programs, but a common one for operating systems is to abstract over hardware.
Consider a program, running on some hardware:
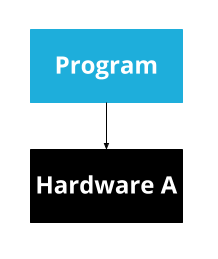
This program will need to know exactly about what kind of hardware exists. If you want to run it on a different computer, it will have to know exactly about that computer too. And if you want to write a second program, you’ll have to re-write a bunch of code for interacting with the hardware.
All problems in computer science can be solved by another level of indirection.
- David Wheeler
To solve this problem, we can introduce an abstraction:
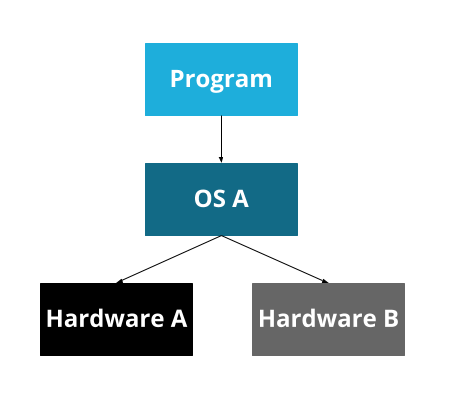
Now, the operating system can handle the details of the hardware, and provide an API for it. A program can be written for that operating system’s API, and can then run on any hardware that the operating system supports.
At some point, though, we developed many operating systems. Since operating systems are platforms, most people pick one and have only that one on their computer. So now we have a problem that looks the same, but is a bit different: our program is now specific to an OS, rather than specific to a particular bit of hardware.
To solve this, some programming languages have a ‘virtual machine.’ This was a big selling point of Java, for example: the Java Virtual Machine. The idea here is that we create a virtual machine on top of the real machine.
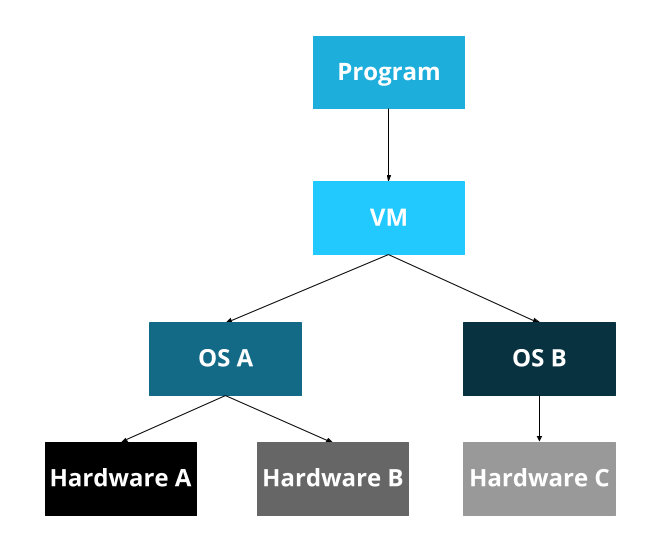
Now, you write programs for the Java Virtual Machine, which is then ported to each operating system, which is then ported to all the hardware. Whew!
This, of course, leads to the corollary to the previous maxim:
...except for the problem of too many layers of indirection.
- Kevlin Henney
We now have a pattern:
- I have
A. Ais written explicitly forX...- ... but I want to support
XandY, - so I put abstraction
Bin the middle.
We will see this pattern over and over again. Hence ‘intermezzo’: abstractions are always in the middle.
Isolation
Many of the abstractions provided are, as we discussed, abstractions over hardware. And hardware often has a pretty serious restriction: only one program can access the hardware at a time. So if our operating system is going to be able to run multiple programs, which is a common feature of many operating systems, we’ll also need to make sure that multiple programs cannot access hardware at the same time.
This really applies to more than just hardware though: it also applies to shared resources (e.g. memory). Once we have two programs, it would be ideal to not let them mess with each other. Consider any sort of program that deals with your password: if programs could mess with each other’s memory and code, then a program could trivially steal your password from another program!
This is just one symptom of a general problem. It’s much better to isolate programs from each other, for a number of different reasons. For now, we’ll just consider isolation as one of our important jobs, as OS authors.
Wait a minute...
Here’s a question for you to ponder: if we didn’t provide isolation, isn’t that just a poor abstraction? In other words, if we had an abstraction where we could interact with other things being abstracted... isn’t that just a bad job of doing the abstraction? And in that sense, is the only thing an operating system does abstraction? Is the only thing everything does abstraction?
I don’t have answers for you. If you figure it out, let me know...
What kinds of OS are there?
Okay, so here’s the thing: operating systems are made up of a lot of components. The core component is called a ‘kernel’. The non-kernel bits of an operating system are collectively called a ‘userland’. Typically a kernel has more direct access to the machine than a userland and thus acts somewhat like a super user (with powers that even ‘sudo’ cannot give you). A kernel forms the basis of the abstractions and isolations. So, as OS developers, when we categorize operating systems, we tend to categorize them by what kinds of kernel they have.
By the way...
Although you may be used to hearing the term ‘Linux’ used as a name for an operating system, you may hear some people say, “It’s GNU/Linux, not Linux.” That’s because virtually all Linux distributions today use a Linux kernel + a GNU userland. So the GNU folks are a bit annoyed that the kernel gets all the credit. By the same token, a lot of people say ‘the kernel’ when they mean ‘the Linux kernel.’ This gets an entirely different set of people mad.
At the start, our ‘operating system’ will be just the kernel, and so we’ll tend to focus on kernels for the first part of our journey.
The way that we categorize different kernels largely comes down to “what is in the kernel and what is in userspace.” Upon reading this, you might then think the easiest kind of kernel to write is the smallest, where everything is in userspace. After all, smaller should be easier, right? Well... that’s not actually true. Or at least, it’s not clear that it’s true.
Monolithic kernels
First, we have ‘monolithic kernels’. ‘Mono’ meaning ‘one’. One big ol’ kernel. Most real-world kernels are monolithic kernels, or at least, pretend to be. Don’t worry about it. Linux, for example, is a monolithic kernel.
This means that monolithic kernels are kind of ‘the default’. Other kernels usually define themselves by solving some kind of problem that monolithic kernels have.
If a monolithic kernel were a web application, it would be a big ol’ Rails application. One repository. A million subdirectories. It may be a big ball of mud, but it pays the bills.
Microkernels
Microkernels are, well, micro. Smaller. A lot of the functionality that’s typically in the kernel is in userspace instead. This is a good idea in theory, but historically, microkernels have had issues. All that communication has overhead, which makes them slower.
Mach, the kernel that Mac OS X uses, is a microkernel. Well, sort of. It ended up being one, but Mac OS X uses a version of Mach from before that work was done... so it’s a bit blurry.
If a microkernel were a web application, it would be a microservice. And a bunch of the other stuff that’s in kernel space in a monolithic kernel are other microservices, but in userspace instead. It’s a bit cooler than a single monolithic web app by itself, and the communication is nice for flexibility’s sake, but has some overhead.
Exokernels & Unikernels
These two kinds of operating systems are closely related, but it’s a bit harder to dig into what exactly makes them different. Unikernels have one easy-to-describe feature: they only run one single program at a time. Exokernels are ‘more micro than micro’, but the details aren’t important right now.
The important thing to know here is that there are a lot of other kinds of designs than just monolithic vs. micro. There’s a lot of stuff to learn!
What kind are we making?
So, given all these kinds of operating systems, what kind are we making?
The answer is “it doesn’t even matter at first.” There’s some commonality in almost all of these styles of operating systems, and we have to get all that done before we even make those decisions.
Secondly, we could waste a lot of time trying to design our perfect OS. And then never actually build it. Remember, the goal here is to learn, not to make the best OS that ever existed. So really, what it ends up looking like just doesn’t really matter at all. Most hobby operating system projects die quite young.
Let’s focus on the doing, and less on the categorization, planning, and being. A nice thing about operating systems is that there’s a lot of freedom of direction. To tie it back into the example earlier, Phil’s tutorial starts going into memory-management after getting printing to the screen going. We’ll be going into keyboards first instead. There are, of course, some dependencies, but there’s also a lot of freedom.
What tools will we use?
Before we can make a kernel, we need to figure out the tools we’re going to use. The first question, of course, is what programming language?
In our case, we’re going to use two. The first one is the language that every kernel must use: assembly language.
Assembly
Assembly language gives us direct access to a specific machine. If the basis of computer science is abstraction, the very bottom of the software abstraction layer is assembly. Below it lies only hardware and physics.
There are many kinds of assembly languages each targeted at different ‘instruction set’ architectures (also known as ISA or simply as instruction sets). These instruction sets are the list of commands that a given CPU can understand. For example, if your computer has an Intel Pentium processor of some kind then it understands the x86 instruction set. So if you were to write assembly for another instruction set (say MIPS or ARM), you would not be able to run it on your computer.
This is one of the reasons we'll want to get away from the assembly world as fast as possible. If we want our kernel to work for a bunch of different architectures, any code we end up writing in assembly will need to be duplicated. However, if we use a more high-level language like C, C++ or the language we'll really be using, Rust, we can write the code once and cross-compile to different architectures.
Assembly language looks like this:
; foo.asm

section .data
global _start

_start:
    mov rax, 0
loop:
    add rax, 1
    cmp rax, 10
    jne loop

    mov rbx, rax
    mov rax, 1
    int 80h
This is a little program in assembly language. If it looks totally alien to you, don't worry. While we could write our entire kernel in assembly, we'll only be learning as much assembly as we need to not have to use it any more.
When you write assembly language you are actually directly manipulating the individual registers of the CPU and memory inside of RAM and other hardware devices like CD drives or display screens.
By the way...
CPUs are composed of registers each of which can only hold small amounts of data. The amount of data a register can hold dictates what type of CPU the register belongs to. If you didn't know why your machine is classified as either 32 bit or 64 bit it's because the machine's registers can either hold 32 bits of data at a time or 64 bits at a time.
In assembly we can only do very simple things: move data between registers or to/from RAM; perform simple arithmetic like addition, subtraction, multiplication and division; compare values in different registers, and based on these comparisons jump to different points in our code (à la GOTO). Fancy high level concepts like while loops and if statements, let alone garbage collection are nowhere to be found. Even functions as you know them aren't really supported in assembly. Each assembly program is just a bunch of data in registers or in memory and a list of instructions, carried out one after the other.
For instance, in our code above we used the mov instruction several times to
move values into specific registers with weird names like rax and rbx. We
used the cmp instruction to compare the value inside of the rax register
with the number 10. We used the jne instruction to jump to another part of
our code if the numbers we just compared were not equal. Finally we used the int
instruction to trigger a hardware interrupt.
Again, you don't need to fully understand this program at this point. Right now you should just have an impression for how assembly is composed of simple instructions that do very simple things.
When it comes time to write some actual assembly code we'll touch on all this again.
Let's run this little program:
$ nasm -f elf64 foo.asm # assemble into foo.o
$ ld foo.o              # link into a.out
$ ./a.out               # run it
$ echo $?               # print out the exit code
10
$
Don't worry too much about what programs we're using to actually compile (or ‘assemble’ as it's known in the assembly world) our program. We'll be going over each one of these commands and explaining what they are and how to use them.
Rust
We will augment our assembly with code written in Rust. In fact, we will be trying to get to Rust-land as quickly as we possibly can. Rust is a really great programming language, and it’s pretty great for writing operating systems. It has some rough edges, but they’re not too big of a deal.
Rust will allow us to write:
// foo.rs

use std::process;

fn main() {
    let mut a = 0;

    for _ in 0..10 {
        a = a + 1;
    }

    process::exit(a);
}
This does the same thing as our assembly code:
$ rustc foo.rs # compile our Rust code to foo
$ ./foo        # run it
$ echo $?      # print out the exit code
10
$
That Rust code probably looks more like a programming language you’ve used in the past. It’s a lot nicer to write complex things in a higher-level programming language like Rust. That said, virtually all languages are higher-level than assembly, so that’s not saying all that much. Rust is still a low-level language by many standards.
So why choose Rust? Well, I’m picking it for two reasons:
- I love it.
- There aren’t a lot of kernels in it yet.
There are a suprising number of people working on kernels in Rust. But since it’s a newer language, there aren’t nearly as many as for older, more established languages.
Do I need to be a wizard?
No, you do not. A common theme of this project is “this is all we’ll need to know about this topic for now.” There’s no reason that you need to absolutely master everything before going forward. For example, in order to get Rust going, we need only about 100 lines of assembly, as mentioned above. Do you need to be a complete expert in assembly language to understand those well enough to keep going? Not at all. Will learning more about it help? Absolutely!
There’s nobody that’s monitoring your credentials to see if you’re allowed to move on. Do it at your own pace. Skip stuff. Come back when you don’t understand what’s going on. Try it, wait a week, and then try it again.
There’s no wrong way to do this stuff, including by being a beginner. Everyone was once. Don’t let anyone discourage you.
From Zero to "Hello, world!"
A "hello world" program is traditional amongst programmers as your first program. This dates back to 1972, in the "Tutorial Introduction to the Language B", a language that proceeded C. A "hello world" program does nothing other than print out the words "hello, world" to the screen. While it's fun to participate in traditions, it also serves a practical purpose: if you can get this simple program working, you know that you've installed everything correctly, you've got your build set up, and that everything is working.
In this chapter, we'll:
- Set up a development environment
- Get everything building
- Boot up our OS and print "Hello world" to the screen
Let's get started!
Setting up a development environment
Traditionally, getting a development environment set up for working on an operating system is really hard. However, we have it pretty easy! We'll be using the Rust programming language to develop our kernel, and thanks to some awesome work by the language developers, as well as the homebrew Rust operating system community, getting our environment set up is really easy.
To get going, you'll need a few tools:
- An editor or IDE to write the source code
- A compiler and other tools to turn that source code into binary code
- A virtual machine to try our OS out without installing it on our computer
- A project directory to do develop in
You can get all of these tools working on Windows, macOS, and Linux. Other operating systems may work, but we've only tried this on these systems. This section is the only one with OS-specific instructions; from here on out, everything will be identical.
An editor or IDE
This is needed, but is also largely a personal choice. You can use whatever you'd like here, and that's 100% fine.
If you're not sure what to use, I do have two recommendations though. If you prefer text editiors, give Visual Studio: Code a try. It's fairly light-weight, but also has some nice features, and a great Rust plugin provided by the Rust team.
If you prefer IDEs, I'd suggest Clion with the Rust plugin. JetBrains makes a suite of IDEs for a ton of languages, and their Rust support is solid!
Really, anything works though: I use both of the above, and also vim at
times. It's just not a huge deal.
The compiler and other tools
Next, we need to get the Rust compiler installed. To do that, head to Rust's install page and follow the instructions. You can also install Rust another way if you'd prefer, such as from your system's package manager, but through the website is generally easiest.
This will give you a tool called rustup, used to manage versions of
rustc, the Rust compiler, and Cargo, the package manager and
build tool. To check that this was installed properly, run these
three commands and check that you get some output:
$ rustup --version
$ rustc --version
$ cargo --version
If you do, everything's good!
Stable vs. Nightly Rust
One of the reasons that it's easiest is that you can't use any version of Rust to develop OSes; you need "nightly" Rust. Basically, Rust comes in different flavors, and in order to develop operating systems, we need to use some experimental, cutting-edge features. As such, we can't use the stable Rust distribution, we need the nightly one.
To install nightly, do this:
$ rustup update nightly
This will download and install the nightly toolchain. We'll configure the use of this toolchain automatically in the next section.
Other tools
We need to install two more tools for building our OS. The first is
called bootimage, and its job is to take our kernel and produce a file
that our virtual machine (discussed in the next section) knows how to
run. To install it:
$ cargo install bootimage
To check that it installed correctly, run this:
$ bootimage --help
And you should see a help message printed to the screen.
The second tool is called cargo-xbuild. It extends Cargo, allowing us to
build Rust's core libraries for other OSes than the ones provided by the Rust
team. To install it:
$ cargo install cargo-xbuild
And to check that it was installed correctly, run this:
$ cargo xbuild --version
And make sure that you get some version output.
Additionally, to do its job, cargo-xbuild needs the source code for these
core libraries; to get those, run this:
$ rustup component add rust-src --toolchain=nightly
With that, we're all set up!
A virtual machine
In order to see that your code runs, you could install it on a real computer, but that is way too complex for regular development. Instead, we can use a virtual machine to give our OS a try locally.
There's a few options, but for this, we'll use Qemu. Qemu works on all of our platforms, and has enough features for us too. Qemu's downloads page should help you get it installed.
To check that it's working, try this:
$ qemu-system-x86_64 --version
And make sure it spits out a version number.
A project directory
Finally, we need to put our source code somewhere. This can be wherever you'd like,
but for this book, we'll call ours ~/src/. You'll see examples have this path in
the output, just to have something, but you can do this anywhere you'd like. We'll
call this "your project directory" a few times in the book, and we mean wherever you
decided to put stuff.
That's it!
With that, we're done! Let's actually get some code going!
Setting up a project
Now that we are all set up, let's get going! First, let's go to our project directory:
$ cd ~/src
And then, we'll use cargo new to create a new binary project:
$ cargo new --bin intermezzos
     Created binary (application) `intermezzos` project
Feel free to name your kernel something else!
This will create a new directory, intermezzos, inside our project
directory. Let's move into it:
$ cd intermezzos
Cargo has created three things for us: a src/main.rs file, that contains
our Rust source code. A Cargo.toml, which contains metadata about our
project. And finally, a .gitignore, if you use git.
Sidebar: Rust knowledge
We don't inherently assume that you know Rust well, but this book also isn't a Rust tutorial. We'll try to explain the basics of the code we're writing, but you may want to check out The Rust Programming Language if you don't understand our basic explanations here. If you've never used Rust before, you might want to take a moment and skim Chapter 3, which covers the basic syntax and talks about stuff you've seen in programming languages you have used in the past.
Our first Hello, World
If you investigate the contents of src/main.rs, you'll find this:
fn main() {
    println!("Hello, world!");
}
Cargo generated a "hello world" program for us! Let's try it out:
$ cargo run
   Compiling intermezzos v0.1.0 (file:///~/src/intermezzos)
    Finished dev [unoptimized + debuginfo] target(s) in 2.5 secs
     Running `target/debug/intermezzos.exe`
Hello, world!
If you see the "Hello, world!" printed to your screen, then your Rust toolchain is working!
Hosts and Targets
This program is compiled for our own computer hardware and operating system. The computer we're compiling from is called the "host system." But, our new OS won't be using the OS of the computer we're doing development on! The computer we want to compile to is called the "target system."
When the host and target system are the same, most people just say "compiling." When they host and taget are different, people say that you're "cross-compiling."
To cross-compile, cargo takes an argument, --target. We can then tell it
what kind of computer we want to compile to, and it will do the right thing.
However, by default, Rust can't know every single kind of computer and OS
that we would want to compile to: after all, we're creating a new OS right
now!
To solve this, we need to write some JSON.
Creating intermezzos.json
Rust has a feature called "target specifications" that lets us, well, specify a target. To do that, we create a JSON file, and use it to describe all the things that the compiler needs to know in order to generate the proper code.
Create a new file named intermezzos.json and put this in it:
{
  "llvm-target": "x86_64-unknown-none",
  "data-layout": "e-m:e-i64:64-f80:128-n8:16:32:64-S128",
  "arch": "x86_64",
  "target-endian": "little",
  "target-pointer-width": "64",
  "target-c-int-width": "32",
  "os": "none",
  "linker": "rust-lld",
  "linker-flavor": "ld.lld",
  "executables": true,
  "features": "-mmx,-sse,+soft-float",
  "disable-redzone": true,
  "panic-strategy": "abort"
}
To learn more about this file, check out Appendix A. For now, it's mostly a distraction; you don't need to know what's going on here to continue.
Removing the standard library
Okay, let's write some Rust! Delete the code in src/main.rs, and replace it
with this:
# #![allow(unused_variables)]
#![feature(panic_handler)]
#![feature(core_intrinsics)]
#![no_std]
#![no_main]

#fn main() {
extern crate bootloader;

use core::intrinsics;
use core::panic::PanicInfo;

#[panic_handler]
#[no_mangle]
fn panic(_info: &PanicInfo) -> ! {
    unsafe { intrinsics::abort() }
}

#[no_mangle]
pub fn _start() -> ! {
    loop {}
}
#}
Let's go over the code, bit by bit:
# #![allow(unused_variables)]
#fn main() {
// ...

#![no_std]
#![no_main]

// ...
#}
These two attributes tell Rust, "hey, we don't want a standard library, and
we don't want a main function." When writing an OS, we want full control
over the details. The Rust standard library assumes that an operating system
exists, and we don't have any of that yet, so we can't use it. Rust's default
main includes stuff that we could use, but it's nicer to write our own,
so we have that full control.
# #![allow(unused_variables)]
#![feature(panic_handler)]
#![feature(core_intrinsics)]

#fn main() {
// ...

extern crate bootloader;

use core::intrinsics;
use core::panic::PanicInfo;

#[panic_handler]
#[no_mangle]
fn panic(_info: &PanicInfo) -> ! {
    unsafe { intrinsics::abort() }
}
#}
When we don't include the standard library, then we're missing one important
thing: if we panic!, Rust wants to call a callback before aborting. This is
that callback. All we do is abort our program.
The extern crate line will set up our bootloader, that is, the code that
loads our OS after the computer starts up. We'll talk more about this later.
Other than that, this is boilerplate. We'll talk about this stuff more when we actually do something on panics; for now, don't worry about it.
# #![allow(unused_variables)]
#fn main() {
// ...

#[no_mangle]
pub fn _start() -> ! {
    loop {}
}
#}
This is our main function, even though it's named _start. Have you ever
wondered how main gets called? Technically, _start gets called first,
then that calls your main function. Any setup code goes in _start, and
would run before it calls main.
Let's explain this function in a bit more detail. The #[no_mangle]
attribute says "hey Rust, it's really important that this function is named
exactly this." You see, Rust is free to rename functions for you. There's
good reasons for this that we won't get into here. This attribute disables
that. If Rust renamed this function, then we wouldn't be able to boot up
properly. We'll explain more in the next section.
The ! return type means we never return, and we never return because the
only thing we do is loop forever!
With this code, our little kernel will start, and then do nothing. It's a start!
Aborting on panic
While we set up a panic handler, that's not the only thing that occurs on
a panic. After our handler is called, Rust can do one of two things: abort
the entire program, or "unwind the stack." Since we're an OS, if our OS
panics, we want to abort. Unwinding can be useful for some applications, but
not an OS, as if we crash, it's all over. As such, we're going to skip over
explaining what unwinding is for now, and simply set things up to abort. Go
into Cargo.toml and add these lines:
[profile.dev]
panic = "abort"

[profile.release]
panic = "abort"
Cargo has a concept of "release profiles" that let us get a development build or a release build. With this configuration, we're telling the Rust compiler that we want to abort when a panic occurs.
Including a bootloader
Earlier we had an extern crate line talking about bootloader.
We need to add that to our Cargo.toml:
[dependencies]
bootloader = "0.6.4"
Compiling with bootimage
Now that we have our code, it's time to compile it! First, we want to make sure that we are using the nightly version of Rust, so run this:
$ rustup override set nightly
Now, any time we're in this project, rustup will ensure we're using nightly
Rust, automatically.
To build the project, we use the bootimage tool we installed earlier. Run this:
$ bootimage build --target=intermezzos.json
The target flag must have the same name as the .json file you've made, so
if you picked a different name, make sure to use it here!
You should see some output that looks like this:
$ bootimage --target=intermezzos
   Compiling core v0.0.0 (file:///~/.rustup/toolchains/nightly-x86_64-pc-windows-msvc/lib/rustlib/src/rust/src/libcore)
    Finished release [optimized] target(s) in 65.72 secs
   Compiling intermezzos v0.1.0 (file:///~/src/intermezzos/intermezzos)
    Finished dev [unoptimized + debuginfo] target(s) in 0.82 secs
Downloading bootloader...
Creating disk image at bootimage.bin
If you remember from Chapter 2, we installed two tools: bootimage and
cargo-xbuild. In this case, what happens is:
bootimagecallsxargoto compilelibcore, Rust's smallest library.cargo-xbuildcallscargoto build our OS, passing flags to use that newlibcore.cargocallsrustcto actually compile our OS's code itself.bootimagethen takes our code and makes a.binfile.
Whew! That's a lot of stuff. We'll go over the details of what exactly these
steps mean in the next section. But at this point, if bootimage.bin exists,
you've successfully compiled your very first OS! It doesn't do much, but
everyone starts somewhere.
Running with qemu
Let's try running it! To load up our OS in qemu, type this:
$ qemu-system-x86_64 -drive format=raw,file=bootimage.bin
You should hopefully get something that looks like this:
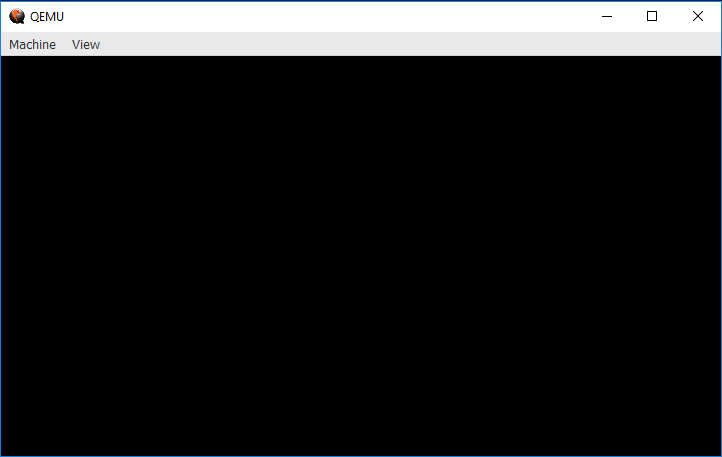
Hooray! Since our OS does nothing, we get a blank screen. To be clear, this is emulating hardware, and our OS is running on it, on our own computer. Excellent!
Let's step back slightly and go over what that command does:
qemu-system-x86_64
qemu installs virtual machines for all kinds of systems, we specifically
want an x86_64 machine, so we need to invoke the command that will start
it.
-drive
This parameter sets up a disk drive for our virtual machine. We need one of those so that it knows what to actually load.
format=raw,file=bootimage.bin
This is the value of the -drive parameter. It's split into two parts; the
first is that we want the format to be 'raw', that is, just use the bytes
directly, it's not formatted as a specific filesystem. The second is the file
that we want to actually load for that disk; it's our bootimage.bin file we
just produced with bootimage.
Some conveniences
bootimage can make this even easier! Go to your Cargo.toml, and add
this section:
[package.metadata.bootimage]
default-target = "intermezzos.json"
If you named your JSON file something different, use that name.
Once we've done this, we can do:
$ bootimage build
$ bootimage run
With this, bootimage build will default to --target=intermezzos.json, and
bootimage run will run the same Qemu command we've been using so far. This
is much more convenient!
For more info, see bootimage's documentation.
Conclusion
Congrats! This is the first step on our journey building operating systems. It only gets cooler from here. But before we move on, let's take a step back and investigate in a bit more depth what we actually just did.
From zero to _start in detail
We now have a little kernel. But we used a lot of tools to make it happen. What do these tools actually do? This section is titled "in detail," but it's really "in more detail than we've seen thus far." We're going to talk about what happens, so you can dig in deeper if you're interested, but we can't possibly cover every single bit in depth.
Here's the basic set of steps:
- We write our kernel code.
- We build it with
bootimage build.- This invokes
cargo-xbuildto cross-compilelibcore. - It then invokes
cargoto take our configuration and set up a build. - Cargo invokes
rustcto actually build the code. - It then takes a precompiled 'bootloader' and our kernel and makes a
.binfile.
- This invokes
- We run it with
bootimage run.- This takes our
.binfile, and runs Qeumu, using that.binas its hard drive.
- This takes our
Whew! That's a lot of stuff. It's not completely different from writing any Rust program, however: you write code, you build it, then you run it. Easy peasy.
Let's dig in a bit!
We write our kernel code
This is the most straightforward step. Write the code! There is some subtlety here, but we talked about it earlier in the chapter: we have to cross-compile to our new platform. We remove the standard library. We configure both the panic handler and the behavior for when a panic happens.
The rest of this book is largely about what to do during this step of development, so we won't belabor it here. You type some code, hit save. Done.
Building our code with bootimage build
Normally, we build Rust code with cargo build, but for an OS, we use
bootimage instead. This is a tool written by Phil Opperman (who we mentioned
in the preface), and it wraps up another tool, also written by Phil,
cargo-xbuild. That tool wraps Cargo. So, in the end, running bootimage build is not too far away from running cargo build conceptually; it's mostly
that Cargo isn't extensible in the way we need at the moment, so we have
to wrap it.
Invoking cargo-xbuild to cross-compile libcore
cargo-xbuild's job is to cross compile Rust's core library. You see, Rust
has an interesting relationship between the language and libraries: some
important parts of the language are implemented as a library, not as a
built-in thing. These foundations, and some other goodies, are included in
the core library. So, before we can build our code, we need to build a copy
of core for our OS. cargo-xbuild makes this easy: it knows how to ask
rustup for a copy of core's source code, and then builds it with our
custom target JSON.
Invoking cargo to take our configuration and set up a build
Now that core is built, we can build our code! Cargo is the tool
in Rust for this task, so cargo-xbuild calls on it to do so. It
passes along our custom target JSON to make sure that we're outputting
a binary for the correct target.
Invoking rustc to build the code
Cargo doesn't actually build our code: it invokes rustc, the Rust compiler,
to actually do the building. Right now our OS is very simple, but as it
grows, and as we split our code into packages, and use external packages,
it's much nicer to let Cargo handle calling rustc rather than doing it by
hand.
Creating a .bin file
Now that we have our OS compiled, we need to prepare it for running. To do
so, bootimage creates a special file, called a .bin file. The .bin
stands for "binary", and it has no real format. It's just a bunch of binary
code. There's no structure, headings, layout, nothing. Just a big old bag of
bits.
However, that doesn't mean that what's in there is random. You see, when you start up your computer, something called the BIOS runs first. The BIOS is all-but hard-coded into your motherboard, and it runs some diagnostic checks to make sure that everything is in order. It then runs the 'bootloader'.
This is either the most interesting or most boring part of this whole enterprise. Almost all of this is piles and piles of backwards compatibility hacks. Since early computers were very small, the bootloader only gets to have 256 bytes of stuff inside it. The eventual goal is to run your OS, but there's a few other possibilities. For example, maybe you have more than one OS on your computer, so the bootloader invokes a program that lets you choose between them. Additionally, even on today's high-powered CPUs, when the bootloader is invoked, they're in a backwards-compatible mode that makes them think they're a processor from the 70s. That's right, we basically didn't ever change the foundations here, simply piled new things on top. "Oh, you think you're an 8-bit computer? Let's set up 16-bit mode. Oh, now you think you're a 16-bit computer? Let's set up 32-bit mode. Oh, now you think you're a 32-bit computer? Let's set up 64-bit mode." And then we can finally start our OS.
You may be wondering, "How does the bootloader do all this in only 256 bytes? This quesiton itself is like 90 bytes!" The answer? Compatibility hacks. Virutally all bootloaders today are multiple stages: the first tiny bootloader sets up a secondary bootloader, and that one then can be larger and do more work.
bootimage has a custom-written bootloader that puts your CPU into
64-bit mode, then calls the _start function of our OS. It assembles
the bootloader's code and our OSs' code into that one .bin file.
Running our code with bootimage run
bootimage run takes our .bin file and passes it to Qemu, the emulator
we discussed earlier in the chapter. Qemu uses the .bin file as the
hard drive, and so when it starts up, its BIOS calls the bootloader
which calls our kernel. It also emulates the screen, so when we start
printing stuff to the screen, we'll see it pop up!
Summary
There's more to explore here, but for now, we're not going to worry about this stuff. It's very platform-specific, and mostly papering over legacy. Instead, let's move forward and make our kernel actually do stuff, not worry about how to put a processor into a specific mode.
In the next chapter, we'll print some characters on the screen!
Interlude: fractal learning
At this point, we're about to start actually learning about how an OS works, and start writing real code. Before we do, I'd like to explain how we're going to learn this stuff. I think this framing is important. I know you're probably excited to get going, but please bear with me for a moment!
It's impossible to learn everything at once. If you keep digging, you'll find more questions, and digging into those questions leads to more questions... at some point, you have to say "okay, I know enough about this for now, it's time to move on." You can always come back to a concept later. And sometimes, you have to go back and forth between different levels of abstraction numerous times to truly get it. This spirals out, like a fractal, with an infinite level of zooming in and out.
I think this is something most programmers know, but it can be hard to remember when working on a hobby operating system. I sometimes think to myself, "Isn't the whole point that I'm trying to learn all the things, all the way down? Is skimming this concept for now okay? Am I cheating?"
The answer, of course, is 'no'. There is no cheating. We're doing this to learn. We'll learn some things at a certain level of abstraction, and then come back to them later and learn more. That's just the way this works. And it also means that sometimes, the chapters you're about to read will say "This is the way this is. It just is. You memorize it and move on." We're about to talk about printing characters to the screen, in various colors. Yellow is represented by a certain number. Why specifically that number? Well, there is a good reason, but it's 100% irrelevant to writing a yellow character on the screen. So we say "This color means yellow" and just get on with life. I've written this VGA code probably ten different times in at least three different languages in the past ten years, and I didn't know why that number meant yellow until last night. In the previous sections, we managed to build a whole "hello world" kernel without understanding fully what was going on. We then circled back and dug in a bit.
It's okay to not "fully" understand something before moving on, whatever that means. You'll get back to it. Sometimes, learning something else is more important than diving into every last detail. And, since you now have the words to understand what it is you need to learn, coming back to the topic later is even easier. You have the terms to search for.
Printing to the screen: a text mode VGA driver
Now that we can build and run our new kernel, it's time to make it actually do someting! We'll get started by printing stuff to the screen. PC-compatible computers implement a graphics API called "VGA", or "video graphics array." You'll come to learn quite soon why that's the name!
First, we'll write out the simplest "hello world" possible. Then, we'll dig a bit deeper into exactly what we did. Finally, we'll refactor our code into an actual, nice-to-use library.
A VGA "hello world"
In the previous chapter, we set up a "hello world" kernel, but we didn't even
print "hello world" to the screen! Let's fix that. Open up your src/main.rs
and modify your _start() function to look like this:
# #![allow(unused_variables)]
#fn main() {
#[no_mangle]
pub fn _start() -> ! {
    let slice = unsafe { core::slice::from_raw_parts_mut(0xb8000 as *mut u8, 4000) };

    slice[0] = b'h';
    slice[1] = 0x02;
    slice[2] = b'e';
    slice[3] = 0x02;
    slice[4] = b'l';
    slice[5] = 0x02;
    slice[6] = b'l';
    slice[7] = 0x02;
    slice[8] = b'o';
    slice[9] = 0x02;
    slice[10] = b' ';
    slice[11] = 0x02;
    slice[12] = b'w';
    slice[13] = 0x02;
    slice[14] = b'o';
    slice[15] = 0x02;
    slice[16] = b'r';
    slice[17] = 0x02;
    slice[18] = b'l';
    slice[19] = 0x02;
    slice[20] = b'd';
    slice[21] = 0x02;

    loop {}
}
#}
If you compile and build with bootimage run, you should see something like
this appear!
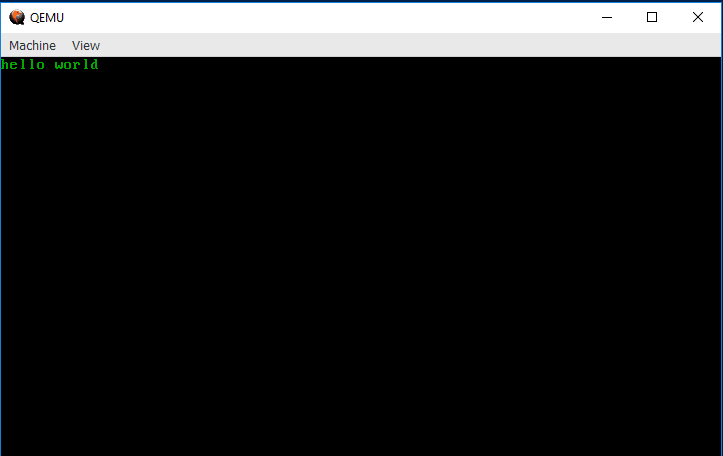
Congrats! You've gotten it to print to the screen. If you look at the code above, you may be getting an idea of why VGA is called "video graphics array"... in the next section, we'll explain what the code above is actually doing.
Understanding text mode
We've called this a "VGA driver" so far, but it's a bit more specific than that: VGA has both graphical and text modes. We're going to be doing text mode, as it's simpler than graphics, and we need to get something going in order to see output.
Memory mapping
The first thing to understand about how VGA's text mode works is that it's "memory mapped." This means that you interact with it by writing to a chunk of memory.
We haven't talked too much about memory yet, and we'll talk about it much more in the future; one of a kernel's many jobs is to manage memory. In general, for the kind of hardware we're writing, memory is linear, that is, the first memory address starts at 0, the next one at 1, and so on and so on.
Like all things, this is fundamentally an abstraction: in the future, when we have programs running on our OS, they will think they're using linear memory even when they're not! That's getting a bit ahead of ourselves, though...
We can refer to a memory location by its particular number, and read values from it, or store values in it. Its number is called its "address," and the amount of memory we can give an address to is called "addressable memory."
How much is that? Well, it depends on the amount of RAM that's installed in our computer. Eventually, our kernel will learn how to ask how much memory is available, but for now, we're using so little memory that we're just going to assume that it's all there and works okay. You have to walk before you can run!
Furthermore, memory addresses are usually written in hexadecimal. The usual
system of numbers humans used is "decimal", or "base 10." Hexadecimal is
"base 16." If you haven't worked with hexadecimal numbers before, you should
check out Appendix B. If you don't want
to, you don't have to: just know that hexadecimal numbers have the letters
a through f in them, and you should be able to follow along at first.
You'll eventually want to come back to this and learn it, though, as we'll be
using them more and more as time goes on.
So, applying this to VGA text mode: there's a block of memory located at the
address 0xb8000, and it consists of four thousand bytes. In our case, a
byte is eight bits, each consisting of a zero or a one. Why is it at this
address? Because that's what the specification says. I'm sure there's a
justification, but it doesn't really matter for our purposes: that's what it
says, so that's what we do.
With this understanding, this line of code on the previous page may make some sense:
# #![allow(unused_variables)]
#fn main() {
let slice = unsafe { core::slice::from_raw_parts_mut(0xb8000 as *mut u8, 4000) };
#}
This creates a &mut [u8], a mutable "slice" of bytes. from_raw_parts_mut
takes a *mut u8, a "raw pointer", and a length, and creates a slice of that
length starting from that pointer. To make a raw pointer, we can write out
the memory address, and then cast with as. The address starts with 0x
because it's written in hexadecimal.
Finally, this is very unsafe, in a Rust sense: we're creating a slice to an
arbitrary spot in memory, and are gonna start writing values to it. We know
that this is okay, because we're a kernel and we know the specification. Rust
doesn't know anything about VGA, and so can't check that this code is
correct. We can, and that's exactly what unsafe is there for.
Writing to the map
Now that we have a slice, we can use [] to index it, and read or write from
any index. The next bit of code looks like this:
# #![allow(unused_variables)]
#fn main() {
slice[0] = b'h';
slice[1] = 0x02;
#}
It repeats in this pattern over and over, in twos.
We're writing things to the first and second locations in our slice. But why do we write these specific things? Well, the first one is called the character byte, and the second is called the attribute byte.
The character byte
The first byte is called the "character byte" because well, it's a character!
More specifically, you can put ASCII characters in here. But more
importantly, you don't write the character itself, you write its numeric
value. That's what the b'' is doing; instead of an 'h', which would be a
char in Rust, and therefore be four bytes (thanks to Unicode), we want the
ASCII version. Rust provides the b'' construct to make getting this value
easy; we can write b'h', but actually get a u8 instead of a char.
The attribute byte
The second byte is the "attribute" byte, and it sets two different things: the foreground color, and the background color. Here's the list of possible colors and their numeric values:
| name | value |
|---|---|
| Black | 0x0 |
| Blue | 0x1 |
| Green | 0x2 |
| Cyan | 0x3 |
| Red | 0x4 |
| Magenta | 0x5 |
| Brown | 0x6 |
| Gray | 0x7 |
| DarkGray | 0x8 |
| BrightBlue | 0x9 |
| BrightGreen | 0xA |
| BrightCyan | 0xB |
| BrightRed | 0xC |
| BrightMagenta | 0xD |
| Yellow | 0xE |
| White | 0xF |
So, these are individual colors, but how do you choose both? Let's look closely at that line again:
# #![allow(unused_variables)]
#fn main() {
slice[1] = 0x02;
#}
See how there's both a 0 and a 2? The first value is 0, the background
color, which is black. The second is 2, the foreground color, which is
green. This is an example of why hexadecimal is useful; we can look at 0x02
and say "oh, black and green" because of the 0 and the 2.
Conclusion
To get a feeling for all of this, try to change the foreground colors, background colors, and letters. Write some letters in different colors than other letters. It's up to you! Once you feel comfortable with this, you can move on to the next section. Even though you can memorize these numbers, you don't have to: we'll create a nicer implementation that makes this much more readable.
A nicer implementation
Coming soon!
Appendix A: target specifications
In Chapter 2, we created intermezzos.json, a "target specification."
Here's the reasons for setting each thing:
"llvm-target": "x86_64-unknown-none",
This is called a "target triple", and is fed to LLVM, the
project that rustc uses to generate the final binary code. It's called a "triple"
becuase it has three parts: the CPU, the vendor, and the OS. So for this target,
we choose the x86_64 CPU, an 'unknown' vendor since we're not a big company or
something, and 'none' for the OS, since our OS does not rely on an OS.
"data-layout": "e-m:e-i64:64-f80:128-n8:16:32:64-S128",
This is another LLVM thing, you can find the documentation here. Honestly, it's not very interesting; feel free to read those docs if you want to learn more.
"arch": "x86_64",
This also sets our CPU architecture; as we said in the target above, it's x86_64.
"target-endian": "little",
"Endian-ness" is a property of how binary numbers are transmitted; there are three forms: "big endian," "little endian," and "network endian", which is a synonym for "big endian." This is because most network protocols choose big endian.
Intel uses little endian for their processors, however, and so we set that here.
"target-pointer-width": "64",
We're building a 64-bit OS, so our pointers are 64 bits wide. If you don't know what a pointer is, don't worry about it yet.
"target-c-int-width": "32",
We're not using C, so this doesn't matter, but if we were, we'd make integers 32 bits. This is common on the x86_64 platform.
"os": "none",
We don't have an OS! We're building one!
  "linker": "rust-lld",
  "linker-flavor": "ld.lld",
We'll be using LLD for linking; this linker is provided by the LLVM project, and automatically distributed with Rust.
"executables": true,
Are executables allowed on this target, or only libraries? That might sound silly, but iOS, for example, won't let you create executables.
"features": "-mmx,-sse,+soft-float",
These flags control the kind of code that Rust generates. For reasons we won't get into right now, many kernels don't use floating point numbers or SIMD registers in the kernel, so we want to turn those options off. (MMX is a similar feature to SIMD). "soft float" means to not use actual floating point hardware instructions, but to emulate them in software. We won't be using floating point numbers at all, directly, but just in case, we want to make sure that we're not going to be using the hardware for it. We'll talk more about this later.
"disable-redzone": true,
This is a very tricky one! The x86_64 "calling convention", that is, the way that assembly code for functions is called, allows for a thing called the "red zone." We do not want this for a kernel. Forgetting this setting runs into all kinds of really strange looking bugs.
"panic-strategy": "abort"
Finally, we don't want to use Rust's panics, so by setting them to abort instead of unwind, we don't generate code to handle panics.
Appendix B: hexadecimal numbers
This is a work in progress, and isn't ready to read yet!
If we were to write this all in decimal:
| name | value |
|---|---|
| Black | 0 |
| Blue | 1 |
| Green | 2 |
| Cyan | 3 |
| Red | 4 |
| Magenta | 5 |
| Brown | 6 |
| Gray | 7 |
| DarkGray | 8 |
| BrightBlue | 9 |
| BrightGreen | 10 |
| BrightCyan | 11 |
| BrightRed | 12 |
| BrightMagenta | 13 |
| Yellow | 14 |
| White | 15 |
The code becomes:
# #![allow(unused_variables)]
#fn main() {
slice[1] = 2;
#}
This will work just as well, but we've lost that 0 to let us know that we
have black. Furthermore, let's take a look at a more complex version:
# #![allow(unused_variables)]
#fn main() {
slice[1] = 0xFA; // White background, BrightGreen foreground

slice[1] = 250;
#}
0xFA in hexadecimal is 250 in decimal, and it completely loses all of the
meaning. We'd have to do the math ourselves to figure out what the color is.
Much easier to write it in hexadecimal in the first place.