intermezzOS

An operating system for learning
Preface
This book describes the intermezzOS project. intermezzOS is a hobby operating system, specifically targeted at showing beginners how to get into operating systems development. Rather than describe some sort of final OS, it instead proceeds in a tutorial-like fashion, allowing you to implement intermezzOS yourself, alongside the book.
The book assumes that you have programmed in some language before, but not any particular one. In fact, people who have not done low-level programming before are a specific target of this book; I’ll be explaining a lot of things that other resources will just assume that you know.
intermezzOS is implemented in Rust, and some assembly code. We’ll try to explain Rust along the way, but may refer you to its documentation when things get tricky. This book isn’t really about learning Rust, but you might accidentally along the way.
You can find all of this stuff on GitHub.
This book is in the book repository, the kernel is in kernel, and the
website is there too. Feel free to open issues on the RFCs
repo if you want to discuss things
in a general sense, and send bug reports and PRs to the appropriate repos
if you’d like to help with a particular component.
The Story
A long time ago, in college, my friends and I were working on a hobby operating system, XOmB. It was... tough. Frankly, while I learned a lot, I was a pretty minor contributor. I got frustrated too easily. One day, I found Ruby, and I was pretty much done with low-level programming. I had done it most of my life, and I was bored. Bored, and sick of dealing with core dumps.
Those details aren’t that important. What is important is that over the years, I’ve always wanted to get back into this stuff. But the problem is this: there are a lot of people who do hobby operating system work, but... I don’t like their attitudes.
You see, a lot of people see low-level programming as some kind of superior, only-for-the-smartest kind of thing. They have a puritanical world-view: “I suffered to learn this, so you too must suffer to build character.” I think that’s short sighted. Low level programming is difficult to get into, but that says more about the teachers’ faults than the students’.
Anyway, as my professional life has moved back towards the low level, I’ve been thinking about this topic a lot again. That’s when I found an awesome link: Writing an OS in Rust by Philipp Oppermann. I cannot speak enough about how awesome Phil’s tutorial is; it single-handedly inspired me to get back into operating systems.
The big difference with Phil’s tutorial is that it doesn’t treat you as being stupid for not knowing ‘the basics’. It doesn’t say “spend hours debugging this thing, because I did.” It doesn’t insult you for being new. It just explains the basics of a kernel.
It’s amazing how much a little bit of a framing can completely change the way you see something. When the examples I found were all about how you have to be an amazing rockstar ninja and we won’t give you all the code because you suck if you can’t figure it out, I hated this stuff. When it was kind, understanding, and helpful, I couldn’t get enough.
Once I got to a certain part in Phil’s tutorial, I started implementing stuff myself. A lot of the initial code here is going to be similar to Phil’s. But I’m going to write about it anyway. There’s a good reason for that:
Writing is nature’s way of showing us how sloppy our thinking is.
- Leslie Lamport
By re-explaining things in my own words, I hope to understand it even better. This is just a perpetual theme with me: I like teaching because it helps me learn. I like writing because it helps me understand.
The first section of the book is going to be clear about where we’re following Phil, and where we break off and go into our own little world. After the start, things will end up diverging.
Furthermore, I will not commit to any kind of schedule for this project. It’s going to be in my spare time, and I’m learning a lot of this as I go, too.
The Name
The nomad has a territory; he follows customary paths; he goes from one point to another; he is not ignorant of points (water points, dwelling points, assembly points, etc.). But the question is what in nomad life is a principle and what is only a consequence. To begin with, although the points determine paths, they are strictly subordinated to the paths they determine, the reverse happens with the sedentary. The water point is reached only in order to be left behind; every point is a relay and exists only as a relay. A path is always between two points, but the in-between has taken on all the consistency and enjoys both an autonomy and a direction of its own. The life of the nomad is the intermezzo.
Deleuze and Guattari, “A Thousand Plateaus”, p380
If you’re not into particular kinds of philosophy, this quote won’t mean a lot. Let’s look at the dictionary definition:
An intermezzo, in the most general sense, is a composition which fits between other musical or dramatic entities, such as acts of a play or movements of a larger musical work.
I want this project to be about learning. Learning is often referred to as a journey. You start off in ignorance and end in knowledge. In other words, ‘learning’ is that part in the middle, the in-between state.
The tricky thing about learning is, you never stop learning. Once you learn something, there’s something new to learn, and you’re on a journey again.
If you want to learn a lot, then you’ll find yourself perpetually in the middle.
There is another sense by which this name makes sense: as we’ll learn in the beginning of the book, operating systems are largely about abstractions. And abstractions are themselves ‘in the middle’, between what they’re abstracting and who they are abstracting it for.
Principles
Here are the guiding principles of intermezzOS:
- We’re all actual people. Please treat each other as such.
- We’re all here to learn. Let’s help each other learn, rather than being some kind of vanguard of knowledge.
- The only thing that matters about your language background is the amount you may have to learn.
- Everything must be documented, or it’s not done.
And of course, everything related to this project is under the Code of Conduct.
Background
Before we get going, we should probably have some idea of where we’re headed.
What is an OS?
It’s actually kind of difficult to define what an operating system is. There are a lot of different kinds of operating systems, and they all do different kinds of things.
Some things are commonly bundled with operating systems, but are arguably not part of the essence of what makes an OS an OS. For example, many operating systems are often marketed as coming equipped with a web browser or email client. Are web browsers and email clients essential to operating systems? Many would argue the answer is no.
There are some shared goals we can find among all operating systems, however. Let’s try this out as a working definition:
An operating system is a program that provides a platform for other programs. It provides two things to these programs: abstractions and isolation.
This is good enough for now. Let’s consider this a test for inclusion, but not exclusion. In other words, things that fit this definition are operating systems, but things that don’t may or may not be, we don’t quite know.
Creating abstractions
There are many reasons to create a platform for other programs, but a common one for operating systems is to abstract over hardware.
Consider a program, running on some hardware:
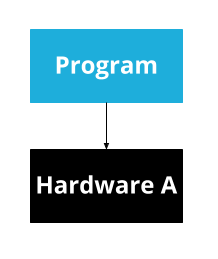
This program will need to know exactly about what kind of hardware exists. If you want to run it on a different computer, it will have to know exactly about that computer too. And if you want to write a second program, you’ll have to re-write a bunch of code for interacting with the hardware.
All problems in computer science can be solved by another level of indirection.
- David Wheeler
To solve this problem, we can introduce an abstraction:
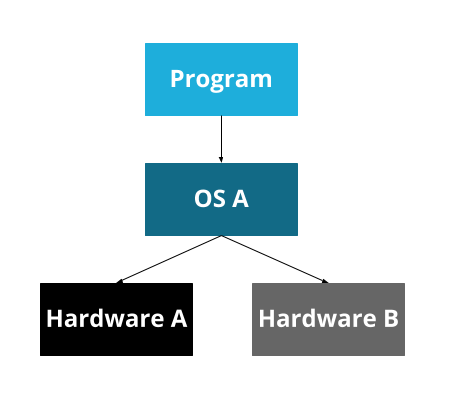
Now, the operating system can handle the details of the hardware, and provide an API for it. A program can be written for that operating system’s API, and can then run on any hardware that the operating system supports.
At some point, though, we developed many operating systems. Since operating systems are platforms, most people pick one and have only that one on their computer. So now we have a problem that looks the same, but is a bit different: our program is now specific to an OS, rather than specific to a particular bit of hardware.
To solve this, some programming languages have a ‘virtual machine.’ This was a big selling point of Java, for example: the Java Virtual Machine. The idea here is that we create a virtual machine on top of the real machine.
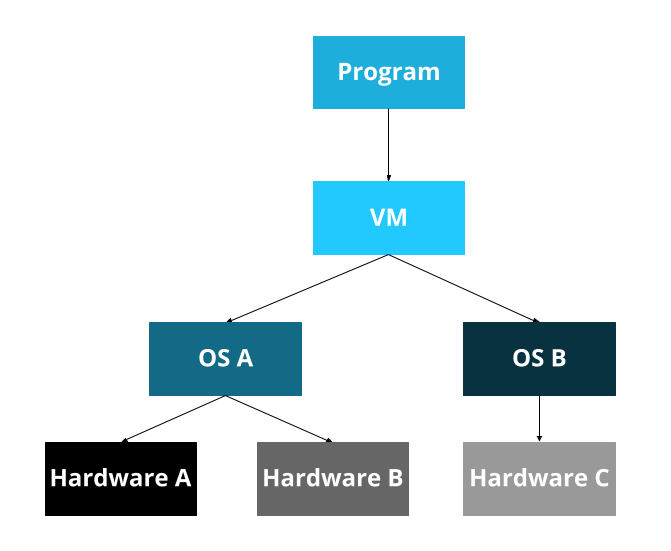
Now, you write programs for the Java Virtual Machine, which is then ported to each operating system, which is then ported to all the hardware. Whew!
This, of course, leads to the corollary to the previous maxim:
...except for the problem of too many layers of indirection.
- Kevlin Henney
We now have a pattern:
- I have
A. Ais written explicitly forX...- ... but I want to support
XandY, - so I put abstraction
Bin the middle.
We will see this pattern over and over again. Hence ‘intermezzo’: abstractions are always in the middle.
Isolation
Many of the abstractions provided are, as we discussed, abstractions over hardware. And hardware often has a pretty serious restriction: only one program can access the hardware at a time. So if our operating system is going to be able to run multiple programs, which is a common feature of many operating systems, we’ll also need to make sure that multiple programs cannot access hardware at the same time.
This really applies to more than just hardware though: it also applies to shared resources (e.g. memory). Once we have two programs, it would be ideal to not let them mess with each other. Consider any sort of program that deals with your password: if programs could mess with each other’s memory and code, then a program could trivially steal your password from another program!
This is just one symptom of a general problem. It’s much better to isolate programs from each other, for a number of different reasons. For now, we’ll just consider isolation as one of our important jobs, as OS authors.
Wait a minute...
Here’s a question for you to ponder: if we didn’t provide isolation, isn’t that just a poor abstraction? In other words, if we had an abstraction where we could interact with other things being abstracted... isn’t that just a bad job of doing the abstraction? And in that sense, is the only thing an operating system does abstraction? Is the only thing everything does abstraction?
I don’t have answers for you. If you figure it out, let me know...
What kinds of OS are there?
Okay, so here’s the thing: operating systems are made up of a lot of components. The core component is called a ‘kernel’. The non-kernel bits of an operating system are collectively called a ‘userland’. Typically a kernel has more direct access to the machine than a userland and thus acts somewhat like a super user (with powers that even ‘sudo’ cannot give you). A kernel forms the basis of the abstractions and isolations. So, as OS developers, when we categorize operating systems, we tend to categorize them by what kinds of kernel they have.
By the way...
Although you may be used to hearing the term ‘Linux’ used as a name for an operating system, you may hear some people say, “It’s GNU/Linux, not Linux.” That’s because virtually all Linux distributions today use a Linux kernel + a GNU userland. So the GNU folks are a bit annoyed that the kernel gets all the credit. By the same token, a lot of people say ‘the kernel’ when they mean ‘the Linux kernel.’ This gets an entirely different set of people mad.
At the start, our ‘operating system’ will be just the kernel, and so we’ll tend to focus on kernels for the first part of our journey.
The way that we categorize different kernels largely comes down to “what is in the kernel and what is in userspace.” Upon reading this, you might then think the easiest kind of kernel to write is the smallest, where everything is in userspace. After all, smaller should be easier, right? Well... that’s not actually true. Or at least, it’s not clear that it’s true.
Monolithic kernels
First, we have ‘monolithic kernels’. ‘Mono’ meaning ‘one’. One big ol’ kernel. Most real-world kernels are monolithic kernels, or at least, pretend to be. Don’t worry about it. Linux, for example, is a monolithic kernel.
This means that monolithic kernels are kind of ‘the default’. Other kernels usually define themselves by solving some kind of problem that monolithic kernels have.
If a monolithic kernel were a web application, it would be a big ol’ Rails application. One repository. A million subdirectories. It may be a big ball of mud, but it pays the bills.
Microkernels
Microkernels are, well, micro. Smaller. A lot of the functionality that’s typically in the kernel is in userspace instead. This is a good idea in theory, but historically, microkernels have had issues. All that communication has overhead, which makes them slower.
Mach, the kernel that Mac OS X uses, is a microkernel. Well, sort of. It ended up being one, but Mac OS X uses a version of Mach from before that work was done... so it’s a bit blurry.
If a microkernel were a web application, it would be a microservice. And a bunch of the other stuff that’s in kernel space in a monolithic kernel are other microservices, but in userspace instead. It’s a bit cooler than a single monolithic web app by itself, and the communication is nice for flexibility’s sake, but has some overhead.
Exokernels & Unikernels
These two kinds of operating systems are closely related, but it’s a bit harder to dig into what exactly makes them different. Unikernels have one easy-to-describe feature: they only run one single program at a time. Exokernels are ‘more micro than micro’, but the details aren’t important right now.
The important thing to know here is that there are a lot of other kinds of designs than just monolithic vs. micro. There’s a lot of stuff to learn!
What kind are we making?
So, given all these kinds of operating systems, what kind are we making?
The answer is “it doesn’t even matter at first.” There’s some commonality in almost all of these styles of operating systems, and we have to get all that done before we even make those decisions.
Secondly, we could waste a lot of time trying to design our perfect OS. And then never actually build it. Remember, the goal here is to learn, not to make the best OS that ever existed. So really, what it ends up looking like just doesn’t really matter at all. Most hobby operating system projects die quite young.
Let’s focus on the doing, and less on the categorization, planning, and being. A nice thing about operating systems is that there’s a lot of freedom of direction. To tie it back into the example earlier, Phil’s tutorial starts going into memory-management after getting printing to the screen going. We’ll be going into keyboards first instead. There are, of course, some dependencies, but there’s also a lot of freedom.
What tools will we use?
Before we can make a kernel, we need to figure out the tools we’re going to use. The first question, of course, is what programming language?
In our case, we’re going to use two. The first one is the language that every kernel must use: assembly language.
Assembly
Assembly language gives us direct access to a specific machine. If the basis of computer science is abstraction, the very bottom of the software abstraction layer is assembly. Below it lies only hardware and physics.
There are many kinds of assembly languages each targeted at different ‘instruction set’ architectures (also known as ISA or simply as instruction sets). These instruction sets are the list of commands that a given CPU can understand. For example, if your computer has an Intel Pentium processor of some kind then it understands the x86 instruction set. So if you were to write assembly for another instruction set (say MIPS or ARM), you would not be able to run it on your computer.
This is one of the reasons we'll want to get away from the assembly world as fast as possible. If we want our kernel to work for a bunch of different architectures, any code we end up writing in assembly will need to be duplicated. However, if we use a more high-level language like C, C++ or the language we'll really be using, Rust, we can write the code once and cross-compile to different architectures.
Assembly language looks like this:
; foo.asm

section .data
global _start

_start:
    mov rax, 0
loop:
    add rax, 1
    cmp rax, 10
    jne loop

    mov rbx, rax
    mov rax, 1
    int 80h
This is a little program in assembly language. If it looks totally alien to you, don't worry. While we could write our entire kernel in assembly, we'll only be learning as much assembly as we need to not have to use it any more.
When you write assembly language you are actually directly manipulating the individual registers of the CPU and memory inside of RAM and other hardware devices like CD drives or display screens.
By the way...
CPUs are composed of registers each of which can only hold small amounts of data. The amount of data a register can hold dictates what type of CPU the register belongs to. If you didn't know why your machine is classified as either 32 bit or 64 bit it's because the machine's registers can either hold 32 bits of data at a time or 64 bits at a time.
In assembly we can only do very simple things: move data between registers or to/from RAM; perform simple arithmetic like addition, subtraction, multiplication and division; compare values in different registers, and based on these comparisons jump to different points in our code (à la GOTO). Fancy high level concepts like while loops and if statements, let alone garbage collection are nowhere to be found. Even functions as you know them aren't really supported in assembly. Each assembly program is just a bunch of data in registers or in memory and a list of instructions, carried out one after the other.
For instance, in our code above we used the mov instruction several times to
move values into specific registers with weird names like rax and rbx. We
used the cmp instruction to compare the value inside of the rax register
with the number 10. We used the jne instruction to jump to another part of
our code if the numbers we just compared were not equal. Finally we used the int
instruction to trigger a hardware interrupt.
Again, you don't need to fully understand this program at this point. Right now you should just have an impression for how assembly is composed of simple instructions that do very simple things.
When it comes time to write some actual assembly code we'll touch on all this again.
Let's run this little program:
$ nasm -f elf64 foo.asm # assemble into foo.o
$ ld foo.o              # link into a.out
$ ./a.out               # run it
$ echo $?               # print out the exit code
10
$
Don't worry too much about what programs we're using to actually compile (or ‘assemble’ as it's known in the assembly world) our program. We'll be going over each one of these commands and explaining what they are and how to use them.
Rust
We will augment our assembly with code written in Rust. In fact, we will be trying to get to Rust-land as quickly as we possibly can. Rust is a really great programming language, and it’s pretty great for writing operating systems. It has some rough edges, but they’re not too big of a deal.
Rust will allow us to write:
// foo.rs

use std::process;

fn main() {
    let mut a = 0;

    for _ in 0..10 {
        a = a + 1;
    }

    process::exit(a);
}
This does the same thing as our assembly code:
$ rustc foo.rs # compile our Rust code to foo
$ ./foo        # run it
$ echo $?      # print out the exit code
10
$
That Rust code probably looks more like a programming language you’ve used in the past. It’s a lot nicer to write complex things in a higher-level programming language like Rust. That said, virtually all languages are higher-level than assembly, so that’s not saying all that much. Rust is still a low-level language by many standards.
So why choose Rust? Well, I’m picking it for two reasons:
- I love it.
- There aren’t a lot of kernels in it yet.
There are a suprising number of people working on kernels in Rust. But since it’s a newer language, there aren’t nearly as many as for older, more established languages.
Do I need to be a wizard?
No, you do not. A common theme of this project is “this is all we’ll need to know about this topic for now.” There’s no reason that you need to absolutely master everything before going forward. For example, in order to get Rust going, we need only about 100 lines of assembly, as mentioned above. Do you need to be a complete expert in assembly language to understand those well enough to keep going? Not at all. Will learning more about it help? Absolutely!
There’s nobody that’s monitoring your credentials to see if you’re allowed to move on. Do it at your own pace. Skip stuff. Come back when you don’t understand what’s going on. Try it, wait a week, and then try it again.
There’s no wrong way to do this stuff, including by being a beginner. Everyone was once. Don’t let anyone discourage you.
Setting up a development environment
Frankly, one of the hardest parts of starting an operating system is getting a development environment going. Normally, you’re doing work on the same operating system you’re developing for, and we don’t have that luxury. Yet!
There is a convention called a ‘target triple’ to describe a particular platform. It’s a ‘triple’ because it has three parts:
arch-kernel-userland
So, a target triple for a computer which has an x86-64 bit processor running a Linux kernel and the GNU userland would look like this:
x86_64-linux-gnu
However, it can also be useful to know the operating system as well, and so the ‘triple’ part can be extended to include it:
x86_64-unknown-linux-gnu
This is for some unknown Linux. If we were targeting Debian specifically, it would be:
x86_64-debian-linux-gnu
Since it’s four parts, it’s called a ‘target’ rather than a ‘target triple’, but you’ll still hear some people call it a triple anyway.
Kernels themselves don’t need to be for a specific userland, and so you’ll see ‘none’ get used:
x86_64-unknown-none
Hosts & Targets
The reason that they’re called a ‘target’ is that it’s the architecture you’re compiling to. The architecture you’re compiling from is called the ‘host architecture’.
If the target and the host are the same, we call it ‘compiling’. If they are different, we call it ‘cross-compiling’. So you’ll see people say things like
I cross-compiled from x86_64-linux-gnu to x86-unknown-none.
This means that the computer that the developer was using was a 64-bit GNU/Linux machine, but the final binary was for a 32-bit x86 machine with no OS.
So we need a slightly special environment to build our OS: we need to cross-compile from whatever kind of computer we are using to our new target.
Cheat codes
... but we can also cheat. It’s okay to cheat. Well, in this case, it’s really only okay at the start. We’ll eventually have to cross-compile, or things will go wrong.
Here’s the cheat: if you are developing on an x86_64 Linux machine, and you’re
not using any special Linux kernel features, then the difference between
x86_64-linux-gnu and x86_64-unknown-none is really just theoretical. It
will still technically work. For now.
This is a common pitfall with new operating system developers. They’ll start off with the cheat, and it will come back to haunt them later. Don’t worry; I will actually show you how to fix things before they go wrong. Knowing the difference here is still useful.
Installing Rust
First, you need to get a copy of Rust! There's one catch though: you'll need to get exactly the correct version of Rust. Unfortunately, for OS development, we need to take advantage of some cutting-edge features that aren't yet stable.
Luckily, the Rust project has a tool that makes it easy to switch between Rust
versions: rustup. You can get it from the install
page of the Rust website.
By default, rustup uses stable Rust. So let's tell it to install nightly:
$ rustup update nightly
This installs the current version of nightly Rust. We run all of the examples in this book under continuous integration, so we should know if something changes in nightly Rust and breaks. But please file bugs if something doesn't work.
Because nightly Rust includes unstable features, you shouldn't use it unless
you really need to, which is why rustup allows you to override the default
version only when you're in a particular directory. We don't have a directory
for our project yet, so let's create one:
$ mkdir intermezzOS
$ cd intermezzOS
A fun way to follow along is to pick a different name for your kernel, and then change it as we go. Call your kernel whatever you want. intermezzOS was almost called ‘Nucleus’, until I found out that there’s already a kernel with that name that’s installed on billions of embedded devices. Whoops!
Inside your project directory, set up the override:
$ rustup override add nightly
Nice and easy. We can't get the version wrong; rustup handles it for us.
Linux
Here are the tools we’re going to need:
nasmldgrub-mkrescue+xorrisoqemu
How to install the tools depends on your distribution.
On Debian you can install them with
$ sudo apt-get install nasm xorriso qemu build-essential
On Arch Linux you can install them with
$ sudo pacman -S --needed binutils grub mtools libisoburn nasm qemu
And on Fedora with
$ sudo dnf install nasm xorriso qemu
Note that if your Fedora is up-to-date enough you will need to call grub2-mkrescue command instead of grub-mkrescue.
Mac OS X
The tools you need are similar to the tools listed in the Linux instructions, but we will need to build a cross compiler in order to get things working. This is sort of complicated and boring, but we've done some of that boring work for you so you can get up and running quickly.
Make sure you have homebrew installed because you are going
to need it to install some of the tools. You are probably also going to need
Xcode if you don't already have
it. You may have to agree to the Xcode license before you use it. You can do
this by either opening Xcode and accepting the license agreement, or by running
sudo xcodebuild -license in the terminal, scrolling down to the bottom of the
license, and agreeing to it.
Download this script and read through it. There are a couple assumptions
that it makes about the paths where the source is downloaded to and where the
binaries are installed. You might want to change where those locations are.
When possible we try and use brew to install things, but there are some
programs we need to compile. The compiled special versions of the tools are
installed in ~/opt. This is so we don't clobber any version of them that you
may have already installed. The source code for these tools are downloaded in
~/src.
Here is what the script does:
brew installtools that it can likegmp,mpfr,libmpc,autoconf, andautomake- Download and compile tools in order to make a cross compiler:
binutils,gcc,objconv - Download and compile
grubusing the cross compiler
This might take some time to run.
After it is done you should have all the tools you need located in ~/opt. The
tools should be named the same as the tools used in other chapters, but they
might be prefixed with a x86_64-pc-elf-. The exception to this is grub. The
default path for the binaries installed using the above script is $HOME/opt/bin so adjust the PATH variable appropriately.
Windows
Windows 10
If you're using Windows 10, you can use Bash On Ubuntu on Windows to get going in an easy way.
Once you have installed Bash on Ubuntu on Windows, simply follow the Linux
instructions. You'll also need the grub-pc-bin package.
Finally, you'll need an "X server"; this will let us run intermezzOS in a graphical window. Any will do, but we've tried xming and it works well.
Finally, you'll need to run this:
$ export DISPLAY=:0
You can put it in your ~/.bashrc file to have it automatically work on each
session.
Other Windows Versions
I hope to have better instructions for Windows soon; since I don’t have a computer that runs it, I need to figure it out first. If you know how, this would be a great way to contribute.
Booting up
We’ve got some of the theory down, and we’ve got a development environment going. Let’s get down to actually writing some code, shall we?
Our first task is going to be the same as in any programming language: Hello world! It’s going to take a teeny bit more code than in many languages. For example, here’s “Hello, World!” in Ruby:
puts "Hello, world!"
Or in C:
#include<stdio.h>

int main(void) {
    printf("Hello, world!");
}
But it’s not actually that much more work. It’s going to take us 28 lines to get there. And instead of a single command to build and run, like Ruby:
$ ruby hello_world.rb
It’s going to initially take us six commands to build and run our hello world kernel. Don’t worry, the next thing we’ll do is write a script to turn it back into a single command.
By the way, Appendix A has a list of solutions to common problems, if you end up getting stuck.
Multiboot headers
Let’s get going! The very first thing we’re going to do is create a ‘multiboot header’. What’s that, you ask? Well, to explain it, let’s take a small step back and talk about how a computer boots up.
One of the amazing and terrible things about the x86 architecture is that it’s maintained backwards compatibility throughout the years. This has been a competitive advantage, but it’s also meant that the boot process is largely a pile of hacks. Each time a new iteration comes out, a new step gets added to the process. That’s right, when your fancy new computer starts up, it thinks it’s an 8086 from 1976. And then, through a succession of steps, we transition through more and more modern architectures until we end at the latest and greatest.
The first mode is called ‘real mode’. This is a 16 bit mode that the original x86 chips used. The second is ‘protected mode’. This 32 bit mode adds new things on top of real mode. It’s called ‘protected’ because real mode sort of let you do whatever you wanted, even if it was a bad idea. Protected mode was the first time that the hardware enabled certain kinds of protections that allow us to exercise more control around such things as RAM. We’ll talk more about those details later.
The final mode is called ‘long mode’, and it’s 64 bits.
By the way...
Well, that’s actually a lie: there’s two. Initially, you’re not in long mode, you’re in ‘compatibility mode’. You see, when the industry was undergoing the transition from 32 to 64 bits, there were two options: the first was Intel’s Itanium 64-bit architecture. It did away with all of the stuff I just told you about. But that meant that programs had to be completely recompiled from scratch for the new chips. Intel’s big competitor, AMD, saw an opportunity here, and released a new set of chips called amd64. These chips were backwards compatible, and so you could run both 32 and 64 bit programs on them. Itanium wasn’t compelling enough to make the pain worth it, and so Intel released new chips that were compatible with amd64. The resulting architecture was then called x86_64, the one we’re using today. The moral of the story? Intel tried to save you from all of the stuff we’re about to do, but they failed. So we have to do it.
So that’s the task ahead of us: make the jump up the ladder and get to long mode. We can do it! Let’s talk more details.
Firmware and the BIOS
So let's begin by turning the power to our computer on.
When we press the power button, electricity starts running, and a special piece of software, known as the BIOS in Intel land, automatically runs.
With the BIOS we're already in the land of software, but unlike software that you may be used to writing, the BIOS comes bundled with its computer and is located in read-only memory (ROM). While changing or updating stuff in ROM is possible, it's not something you can do by invoking your favorite package manager or by downloading something from some website. In fact some ROM is literally hardwired into the computer and cannot be changed without physically swapping it out. This makes sense here. The BIOS and the computer are lifetime partners. Their existence doesn't make much sense without each other.
One of the first things the BIOS does is run a ‘POST’ or power-on self-test which checks for the availability and integrity of all the pieces of hardware that the computer needs including the BIOS itself, CPU registers, RAM, etc. If you've ever heard a computer beeping at you as it boots up, that's the POST reporting its findings.
Assuming no problems are found, the BIOS starts the real booting process.
By the way...
For a while now most commercial computer manufacturers have hidden their BIOS booting process behind some sort of splash screen. It's usually possible to see the BIOS' logs by pressing some collection of keys when your computer is starting up.
The BIOS also has a menu where you can see information about the computer like CPU and memory specs and all the hardware the BIOS detected like hard drives and CD and DVD drives. Typically this menu is accessed by pressing some other weird collection of keyboard keys while the computer is attempting to boot.
The BIOS automatically finds a ‘bootable drive’ by looking in certain pre-determined places like the computer's hard drive and CD and DVD drives. A drive is ‘bootable’ if it contains software that can finish the booting process. In the BIOS menu you can usually change in what order the BIOS looks for bootable drives or tell it to boot from a specific drive.
The BIOS knows it's found a bootable drive by looking at the first few kilobytes of the drive and looking for some magical numbers set in that drive's memory. This won't be the last time some magical numbers or hacky sounding things are used on our way to building an OS. Such is life at such a low level...
When the BIOS has found its bootable drive, it loads part of the drive into memory and transfers execution to it. With this process, we move away from what comes dictated by the computer manufacturer and move ever closer to getting our OS running.
Bootloaders
The part of our bootable drive that gets executed is called a ‘bootloader’, since it loads things at boot time. The bootloader’s job is to take our kernel, put it into memory, and then transition control to it.
Some people start their operating systems journey by writing a bootloader. We will not be doing that. Frankly, this whole startup process is more of an exercise in reading manuals and understanding the history of esoteric hardware than it is anything else. That stuff may interest you, and maybe someday we’ll come back and write a bootloader of our own.
In the interest of actually getting around to implementing a kernel, instead, we’ll use an existing bootloader: GRUB.
GRUB and Multiboot
GRUB stands for ‘grand unified bootloader’, and it’s a common one for GNU/Linux systems. GRUB implements a specification called Multiboot, which is a set of conventions for how a kernel should get loaded into memory. By following the Multiboot specification, we can let GRUB load our kernel.
The way that we do this is through a ‘header’. We’ll put some information in a format that multiboot specifies right at the start of our kernel. GRUB will read this information, and follow it to do the right thing.
One other advantage of using GRUB: it will handle the transition from real mode to protected mode for us, skipping the first step. We don’t even need to know anything about all of that old stuff. If you’re curious about the kinds of things you would have needed to know, put “A20 line” into your favorite search engine, and get ready to cry yourself to sleep.
Writing our own Multiboot header
I said we were gonna get to the code, and then I went on about more history.
Sorry about that! It’s code time for real! Inside your project directory, make
a new file called multiboot_header.asm, and open it in your favorite editor.
I use vim, but you should feel free to use anything you’d like.
$ touch multiboot_header.asm
$ vim multiboot_header.asm
Two notes about this: first of all, we’re just making this source file in the top level. Don’t worry, we’ll clean house later. Remember: we’re going to build stuff, and then abstract it afterwards. It’s easier to start with a mess and clean it up than it is to try to get it perfect on the first try.
Second, this is a .asm file, which is short for ‘assembly’. That’s right, we’re
going to write some assembly code here. Don’t worry! It’s not super hard.
An aside about assembly
Have you ever watched Rich Hickey’s talk “Simple vs. Easy”? It’s a wonderful talk. In it, he draws a distinction between these two words, which are commonly used as synonyms.
TODO https://github.com/intermezzOS/book/issues/27
Assembly coding is simple, but that doesn’t mean that it’s easy. We’ll be doing a little bit of assembly programming to build our operating system, but we don’t need to know that much. It is completely learnable, even for someone coming from a high-level language. You might need to practice a bit, and take it slow, but I believe in you. You’ve got this.
The Magic Number
Our first assembly file will be almost entirely data, not code. Here’s the first line:
dd 0xe85250d6 ; magic number
Ugh! Gibberish! Let’s start with the semicolon (;). It’s a comment, that
lasts until the end of the line. This particular comment says ‘magic number’.
As we said, you’ll be seeing a lot of magic numbers in your operating system work.
The idea of a magic number is that it’s completely and utterly arbitrary. It
doesn’t mean anything. It’s just magic. The very first thing that the multiboot
specification requires is that we have the magic number 0xe85250d6 right
at the start.
By the way...
Wondering how a number can have letters inside of it?
0xe85250d6is written in hexadecimal notation. Hexadecimal is an example of a "numeral system" which is a fancy term for a system for conveying numbers. The numeral system you're probably most familiar with is the decimal system which conveys numbers using a combination of the symbols0-9. Hexadecimal on the other hand uses a combination of 16 symbols:0-9anda-f. Along with its fellow numeral system, binary, hexadecimal is used a lot in low level programming. In order to tell if a number is written in hexadecimal, you may be tempted to look for the use of letters in the number, but a more surefire way is to look for a leading0x. While100isn't a hexadecimal number,0x100is. To learn more about hexadecimal and binary check this out.
What’s the value in having an arbitrary number there? Well, it’s a kind of safeguard against bad things happening. This is one of the ways in which we can check that we actually have a real multiboot header. If it doesn’t have the magic number, something has gone wrong, and we can throw an error.
I have no idea why it’s 0xe85250d6, and I don’t need to care. It just is.
Finally, the dd. It’s short for ‘define double word’. It declares that we’re
going to stick some 32-bit data at this location. Remember, when x86 first started,
it was a 16-bit architecture set. That meant that the amount of data that could be
held in a CPU register (or one ‘word’ as it's commonly known) was 16 bits.
To transition to a 32-bit architecture without losing backwards compatibility,
x86 got the concept of a ‘double word’ or double 16 bits.
The mode code
Okay, time to add a second line:
dd 0xe85250d6 ; magic number
dd 0          ; protected mode code
This is another form of magic number. We want to boot into protected mode, and
so we put a zero here, using dd again. If we wanted GRUB to do something
else, we could look up another code, but this is the one that we want.
Header length
The next thing that’s required is a header length. We could use dd and count
out exactly how many bytes that our header is, but there’s two reasons why
we’re not doing that:
- Computers should do math, not people.
- We’re going to add more stuff, and we’d have to recalculate this number each time. Or wait until the end and come back. See #1.
Here’s what this looks like:
header_start:
    dd 0xe85250d6                ; magic number
    dd 0                         ; protected mode code
    dd header_end - header_start ; header length
header_end:
You don’t have to align the comments if you don’t want to. I usually don’t, but it looks nice and after we’re done with this file, we’re not going to mess with it again, so we won’t be constantly re-aligning them in the future.
The header_start: and header_end: things are called ‘labels’. Labels let
us use a name to refer to a particular part of our code. Labels also refer to the
memory occupied by the data and code which directly follows it. So in our code above
the label header_start points directly to the memory at the very beginning of our
magic number and thus to the very beginning of our header.
Our third dd line uses those two labels to do some math: the header length is
the value of header_end minus the value of header_start. Because header_start
and header_end are just the addresses of places in memory, we can simply subtract
to get the distance between those two addresses. When we compile this assembly
code, the assembler will do this calculation for us. No need to figure out
how many bytes there are by hand. Awesome.
You’ll also notice that I indented the dd statements. Usually, labels go in
the first column, and you indent actual instructions. How much you indent is up
to you; it’s a pretty flexible format.
The Checksum
The fourth field multiboot requires is a ‘checksum’. The idea is that we sum up some numbers, and then use that number to check that they’re all what we expected things to be. It’s similar to a hash, in this sense: it lets us and GRUB double-check that everything is accurate.
Here’s the checksum:
header_start:
    dd 0xe85250d6                ; magic number
    dd 0                         ; protected mode code
    dd header_end - header_start ; header length

    ; checksum
    dd 0x100000000 - (0xe85250d6 + 0 + (header_end - header_start))
header_end:
Again, we’ll use math to let the computer calculate the sum for us. We add up
the magic number, the mode code, and the header length, and then subtract it
from a big number. dd then puts that value into this spot in our file.
By the way...
You might wonder why we're subtracting these values from 0x100000000. To answer this we can look at what the multiboot spec says about the checksum value in the header:
The field
checksumis a 32-bit unsigned value which, when added to the other magic fields (i.e.magic,architectureandheader_length), must have a 32-bit unsigned sum of zero.In other words:
checksum+magic_number+architecture+header_length= 0We could try and "solve for"
checksumlike so:
checksum= -(magic_number+architecture+header_length)But here's where it gets weird. Computers don't have an innate concept of negative numbers. Normally we get around this by using "signed integers", which is something we cover in an appendix. The point is we have an unsigned integer here, which means we're limited to representing only positive numbers. This means we can't literally represent -(
magic_number+architecture+header_length) in our field.If you look closely at the spec you'll notice it's strangely worded: it's asking for a value that when added to other values has a sum of zero. It's worded this way because integers have a limit to the size of numbers they can represent, and when you go over that size, the values wrap back around to zero. So 0xFFFFFFFF + 1 is.... 0x00000000. This is a hardware limitation: technically it's doing the addition correctly, giving us the 33-bit value 0x100000000, but we only have 32 bits to store things in so it can't actually tell us about that
1in the most significant digit position! We're left with the rest of the digits, which spell out zero.So what we can do here is "trick" the computer into giving us zero when we do the addition. Imagine for the sake of argument that
magic_number+architecture+header_lengthsomehow works out to be 0xFFFFFFFE. The number we'd add to that in order to make 0 would be 0x00000002. This is 0x100000000-0xFFFFFFFE, because 0x100000000 technically maps to 0 when we wrap around. So we replace 0xFFFFFFFE in our contrived example here withmagic_number+architecture+header_length. This gives us:dd 0x100000000 - (0xe85250d6 + 0 + (header_end - header_start))
Ending tag
After the checksum you can list a series of “tags”, which is a way for the OS to tell the bootloader to do some extra things before handing control over to the OS, or to give the OS some extra information once started. We donʼt need any of that yet, though, so we just need to include the required “end tag”, which looks like this:
header_start:
    dd 0xe85250d6                ; magic number
    dd 0                         ; protected mode code
    dd header_end - header_start ; header length

    ; checksum
    dd 0x100000000 - (0xe85250d6 + 0 + (header_end - header_start))

    ; required end tag
    dw 0    ; type
    dw 0    ; flags
    dd 8    ; size
header_end:
Here we use dw to define a ‘word’ instead of just data. Remember a ‘word’ is 16
bits or 2 bytes on the x86_64 architecture. The multiboot specification demands
that this be exactly a word. You’ll find that this is super common in operating systems:
the exact size and amount of everything matters. It’s just a side-effect of
working at a low level.
The Section
We have one last thing to do: add a ‘section’ annotation. We’ll talk more about sections later, so for now, just put what I tell you at the top of the file.
Here’s the final file:
section .multiboot_header
header_start:
    dd 0xe85250d6                ; magic number
    dd 0                         ; protected mode code
    dd header_end - header_start ; header length

    ; checksum
    dd 0x100000000 - (0xe85250d6 + 0 + (header_end - header_start))

    ; required end tag
    dw 0    ; type
    dw 0    ; flags
    dd 8    ; size
header_end:
That’s it! Congrats, you’ve written a multiboot compliant header. It’s a lot of esoterica, but it’s pretty straightforward once you’ve seen it a few times.
Assembling with nasm
We can’t use this file directly, we need to turn it into binary. We can use a program called an ‘assembler’ to ‘assemble’ our assembly code into binary code. It’s very similar to using a ‘compiler’ to ‘compile’ our source code into binary. But when it’s assembly, people often use the more specific name.
We will be using an assembler called nasm to do this. You should invoke
nasm like this:
$ nasm -f elf64 multiboot_header.asm
The -f elf64 says that we want to output a file using the elf64 file
format. ELF is a particular executable format that’s used by various UNIX
systems, and we’ll be using it too. The executable format just specifies how
exactly the bits will be laid out in the file. For example, will there be a
magic number at the beginning of the file for easier error checking? Or where in
the file do we specify whether our code and data is in a 32-bit or 64-bit
format? There are other formats, but ELF is pretty good.
After you run this command, you should see a multiboot_header.o file in
the same directory. This is our ‘object file’, hence the .o. Don't let the
word ‘object’ confuse you. It has nothing to do with anything object oriented.
‘Object files’ are just binary code with some metadata in a particular format -
in our case ELF. Later, we’ll take this file and use it to build our OS.
Summary
Congratulations! This is the first step towards building an operating system.
We learned about the boot process, the GRUB bootloader, and the Multiboot
specification. We wrote a Multiboot-compliant header file in assembly code, and
used nasm to create an object file from it.
Next, we’ll write the actual code that prints “Hello world” to the screen.
Hello, world!
Now that we’ve got the headers out of the way, let’s do the traditional first program: Hello, world!
The smallest kernel
Our hello world will be just 20 lines of assembly code. Let’s begin.
Open a file called boot.asm and put this in it:
start:
    hlt
You’ve seen the name: form before: it’s a label. This lets us name a line
of code. We’ll call this label start, which is the traditional name.
GRUB will use this convention to know where to begin.
The hlt statement is our first bit of ‘real’ assembly. So far, we had just
been declaring data. This is actual, executable code. It’s short for ‘halt’.
In other words, it ends the program.
By giving this line a label, we can call it, sort of like a function. That’s what
GRUB does: “Call the function named start.” This function has just one
line: stop.
Unlike many other languages, you’ll notice that there’s no way to say if this ‘function’ takes any arguments or not. We’ll talk more about that later.
This code won’t quite work on its own though. We need to do a little bit more bookkeeping first. Here’s the next few lines:
global start

section .text
bits 32
start:
    hlt
Three new bits of information. The first:
global start
This says “I’m going to define a label start, and I want it to be available
outside of this file.” If we don’t say this, GRUB won’t know where to find its
definition. You can kind of think of it like a ‘public’ annotation in other
languages.
section .text
We saw section briefly, but I told you we’d get to it later. The place where
we get to it is at the end of this chapter. For the moment, all you need to
know is this: code goes into a section named .text. Everything that comes
after the section line is in that section, until another section line.
bits 32
GRUB will boot us into protected mode, aka 32-bit mode. So we have to specify that directly. Our Hello World will only be in 32 bits. We’ll transition from 32-bit mode to 64-bit mode in the next chapter, but it’s a bit involved. So let’s just stay in protected mode for now.
That’s it! We could theoretically stop here, but instead, let’s actually print the “Hello world” text to the screen. We’ll start off with an ‘H’:
global start

section .text
bits 32
start:
    mov word [0xb8000], 0x0248 ; H
    hlt
This new line is the most complicated bit of assembly we’ve seen yet. There’s a lot packed into this little line.
The first important bit is mov. This is short for move, and it sorta looks
like this:
mov size place, thing
Oh, ; starts a comment, remember? So the ; H is just for us. I put this
comment here because this line prints an H to the screen!
Yup, it does. Okay, so here’s why: mov copies thing into place. The amount
of stuff it copies is determined by size.
;   size place      thing
;   |    |          |
;   V    V          V
mov word [0xb8000], 0x0248 ; H
“Copy one word: the number 0x0248 to ... some place.
The place looks like a number just like 0x0248, but it has square
brackets [] around it. Those brackets are special. They mean “the address
in memory located by this number.” In other words, we’re copying the number
0x0248 into the specific memory location 0xb8000. That’s what this line does.
Why? Well, we’re using the screen as a “memory mapped” device. Specific
positions in memory correspond to certain positions on the screen. And
the position 0xb8000 is one of those positions: the upper-left corner of the
screen.
By the way...
"Memory mapping" is one of the fundamental techniques used in computer engineering to help the CPU know how to talk to all the different physical components of a computer. The CPU itself is just a weird little machine that moves numbers around. It's not of any use to humans on its own: it needs to be connected to devices like RAM, hard drives, a monitor, and a keyboard. The way the CPU does this is through a bus, which is a huge pipeline of wires connecting the CPU to every single device that might have data the CPU needs. There's one wire per bit (since a wire can store a 1 or a 0 at any given time). A 32-bit bus is literally 32 wires in parallel that run from the CPU to a bunch of devices like Christmas lights around a house.
There are two buses that we really care about in a computer: the address bus and the data bus. There's also a third signal that lets all the devices know whether the CPU is requesting data from an input (reading, like from the keyboard) or sending data to an output (writing, like to the monitor via the video card). The address bus is for the CPU to send location information, and the data bus is for the CPU to either write data to or read data from that location. Every device on the computer has a unique hard coded numerical location, or "address", literally determined by how the thing is wired up at the factory. In the case of an input/read operation, when it sends
0x1001A003out on the address bus and the control signal notifies every device that it's a read operation, it's asking, "What is the data currently stored at location0x1001A003?" If the keyboard happens to be identified by that particular address, and the user is pressing SPACE at this time, the keyboard says, "Oh, you're talking to me!" and sends back the ASCII code0x00000020(for "SPACE") on the data bus.What this means is that memory on a computer isn't just representing things like RAM and your hard drive. Actual human-scale devices like the keyboard and mouse and video card have their own memory locations too. But instead of writing a byte to a hard drive for storage, the CPU might write a byte representing some color and symbol to the monitor for display. There's an industry standard somewhere that says video memory must live in the address range beginning
0xb8000. In order for computers to be able to work out of the box, this means that the BIOS needs to be manufactured to assume video lives at that location, and the motherboard (which is where the bus is all wired up) has to be manufactured to route a0xb8000request to the video card. It's kind of amazing this stuff works at all! Anyway, "memory mapped hardware", or "memory mapping" for short, is the name of this technique.
Now, we are copying 0x0248. Why this number? Well, it’s in three parts:
 __ background color
/  __foreground color
| /
V V
0 2 48 <- letter, in ASCII
We’ll start at the right. First, two numbers are the letter, in ASCII. H is
72 in ASCII, and 48 is 72 in hexadecimal: (4 * 16) + 8 = 72. So this will
write H.
The other two numbers are colors. There are 16 colors available, each with a number. Here’s the table:
| Value | Color          |
|-------|----------------|
| 0x0   | black          |
| 0x1   | blue           |
| 0x2   | green          |
| 0x3   | cyan           |
| 0x4   | red            |
| 0x5   | magenta        |
| 0x6   | brown          |
| 0x7   | gray           |
| 0x8   | dark gray      |
| 0x9   | bright blue    |
| 0xA   | bright green   |
| 0xB   | bright cyan    |
| 0xC   | bright red     |
| 0xD   | bright magenta |
| 0xE   | yellow         |
| 0xF   | white          |
So, 02 is a black background with a green foreground. Classic. Feel free to
change this up, use whatever combination of colors you want!
So this gives us a H in green, over black. Next letter: e.
global start

section .text
bits 32
start:
    mov word [0xb8000], 0x0248 ; H
    mov word [0xb8002], 0x0265 ; e
    hlt
Lower case e is 65 in ASCII, at least, in hexadecimal. And 02 is our same
color code. But you’ll notice that the memory location is different.
Okay, so we copied four hexadecimal digits into memory, right? For our H.
0248. A hexadecimal digit has sixteen values, which is 4 bits (for example, 0xf
would be represented in bits as 1111). Two of them make 8 bits, i.e. one byte.
Since we need half a word for the colors (02), and half a word for the H (48),
that’s one word in total (or two bytes). Each place that the memory address points
to can hold one byte (a.k.a. 8 bits or half a word). Hence, if our first memory
position is at 0, the second letter will start at 2.
You might be wondering, "If we're in 32 bit mode, isn't a word 32 bits?" since sometimes ‘word’ is used to talk about native CPU register size. Well, the ‘word’ keyword in the context of x86_64 assembly specifically refers to 2 bytes, or 16 bits of data. This is for reasons of backwards compatibility.
This math gets easier the more often you do it. And we won’t be doing that much more of it. There is a lot of working with hex numbers in operating systems work, so you’ll get better as we practice.
With this, you should be able to get the rest of Hello, World. Go ahead and try if you want: each letter needs to bump the location twice, and you need to look up the letter’s number in hex.
If you don’t want to bother with all that, here’s the final code:
global start

section .text
bits 32
start:
    mov word [0xb8000], 0x0248 ; H
    mov word [0xb8002], 0x0265 ; e
    mov word [0xb8004], 0x026c ; l
    mov word [0xb8006], 0x026c ; l
    mov word [0xb8008], 0x026f ; o
    mov word [0xb800a], 0x022c ; ,
    mov word [0xb800c], 0x0220 ;
    mov word [0xb800e], 0x0277 ; w
    mov word [0xb8010], 0x026f ; o
    mov word [0xb8012], 0x0272 ; r
    mov word [0xb8014], 0x026c ; l
    mov word [0xb8016], 0x0264 ; d
    mov word [0xb8018], 0x0221 ; !
    hlt
Finally, now that we’ve got all of the code working, we can assemble our
boot.asm file with nasm, just like we did with the multiboot_header.asm
file:
$ nasm -f elf64 boot.asm
This will produce a boot.o file. We’re almost ready to go!
Linking it together
Okay! So we have two different .o files: multiboot_header.o and boot.o.
But what we need is one file with both of them. Our OS doesn’t have the
ability to do anything yet, let alone load itself in two parts somehow. We just
want one big binary file.
Enter ‘linking’. If you haven’t worked in a compiled language before, you probably haven’t had to deal with linking before. Linking is how we’ll turn these two files into a single output: by linking them together.
Open up a file called linker.ldand put this in it:
ENTRY(start)

SECTIONS {
    . = 1M;

    .boot :
    {
        /* ensure that the multiboot header is at the beginning */
        *(.multiboot_header)
    }

    .text :
    {
        *(.text)
    }
}
This is a ‘linker script’. It controls how our linker will combine these files into the final output. Let’s take it bit-by-bit:
ENTRY(start)
This sets the ‘entry point’ for this executable. In our case, we called our
entry point by the name people use: start. Remember? In boot.asm? Same
name here.
SECTIONS {
Okay! I’ve been promising you that we’d talk about sections. Everything inside of these curly braces is a section. We annotated parts of our code with sections earlier, and here, in this part of the linker script, we will describe each section by name and where it goes in the resulting output.
. = 1M;
This line means that we will start putting sections at the one megabyte mark. This is the conventional place to put a kernel, at least to start. Below one megabyte is all kinds of memory-mapped stuff. Remember the VGA stuff? It wouldn’t work if we mapped our kernel’s code to that part of memory... garbage on the screen!
.boot :
This will create a section named boot. And inside of it...
*(.multiboot_header)
... goes every section named multiboot_header. Remember how we defined that
section in multiboot_header.asm? It’ll be here, at the start of the boot
section. That’s what we need for GRUB to see it.
.text :
Next, we define a text section. The text section is where you put code.
And inside of it...
*(.text)
... goes every section named .text. See how this is working? The syntax is a
bit weird, but it’s not too bad.
That’s it for our script! We can then use ld to link all of this stuff
together:
$ ld --nmagic --output=kernel.bin --script=linker.ld multiboot_header.o boot.o
Recall that on Mac OS X you will want to use the linker we installed to
~/opt and not your system linker. For example, if you did not change any of
the defaults in the installation script, this linker will be located at
$HOME/opt/bin/x86_64-pc-elf-ld.
By running this command, we do a few things:
--nmagic
TODO: https://github.com/intermezzOS/book/issues/30
--output=kernel.bin
This sets the name of our output file. In our case, that’s kernel.bin. We’ll be using
this file in the next step. It’s our whole kernel!
--script=linker.ld
This is the linker script we just made.
multiboot_header.o boot.o
Finally, we pass all the .o files we want to link together.
That’s it! We’ve now got our kernel in the kernel.bin file. Next, we’re going to
make an ISO out of it, so that we can load it up in QEMU.
Making an ISO
Now that we have our kernel.bin, the next step is to make an ISO. Remember
compact discs? Well, by making an ISO file, we can both test our Hello World
kernel in QEMU, as well as running it on actual hardware!
To do this, we’re going to use a GRUB tool called grub-mkrescue. We have to
create a certain structure of files on disk, run the tool, and we’ll get an
os.iso file at the end.
Doing so is not very much work, but we need to make the files in the right places. First, we need to make three directories:
$ mkdir -p isofiles/boot/grub
The -p flag to mkdir will make the directory we specify, as well as any
‘parent’ directories, hence the p. In other words, this will make an
isofiles directory, with a boot directory inside, and a grub directory
inside of that.
Next, create a grub.cfg file inside of that isofiles/boot/grub directory,
and put this in it:
set timeout=0
set default=0

menuentry "intermezzOS" {
    multiboot2 /boot/kernel.bin
    boot
}
This file configures GRUB. Let’s talk about the menuentry block first.
GRUB lets us load up multiple different operating systems, and it usually does
this by displaying a menu of OS choices to the user when the machine boots. Each
menuentry section corresponds to one of these. We give it a name, in this
case, intermezzOS, and then a little script to tell it what to do. First,
we use the multiboot2 command to point at our kernel file. In this case,
that location is /boot/kernel.bin. Remember how we made a boot directory
inside of isofiles? Since we’re making the ISO out of the isofiles directory,
everything inside of it is at the root of our ISO. Hence /boot.
Let’s copy our kernel.bin file there now:
$ cp kernel.bin isofiles/boot/
Finally, the boot command says “that’s all the configuration we need to do,
boot it up.“
But what about those timeout and default settings? Well, the default setting
controls which menuentry we want to be the default. The numbers start at zero,
and since we only have that one, we set it as the default. When GRUB starts, it
will wait for timeout seconds, and then choose the default option if the user
didn’t pick a different one. Since we only have one option here, we just set it to
zero, so it will start up right away.
The final layout should look like this:
isofiles/
└── boot
    ├── grub
    │   └── grub.cfg
    └── kernel.bin
Using grub-mkrescue is easy. We run this command:
$ grub-mkrescue -o os.iso isofiles
The -o flag controls the output filename, which we choose to be os.iso.
And then we pass it the directory to make the ISO out of, which is the
isofiles directory we just set up.
After this, you have an os.iso file with our teeny kernel on it. You could
burn this to a USB stick or CD and run it on an actual computer if you wanted
to! But doing so would be really annoying during development. So in the next
section, we’ll use an emulator, QEMU, to run the ISO file on our development
machine.
Running in QEMU
Let’s actually run our kernel! To do this, we’ll use QEMU, a full-system emulator. Using QEMU is fairly straightfoward:
$ qemu-system-x86_64 -cdrom os.iso
Type it in, hit Enter, and you should see Hello, world! (To exit, hit
Alt+2 and type quit in the console.)
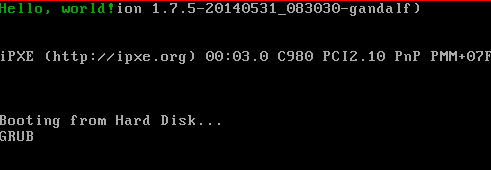
If it shows up for you too, congrats! If not, something may have gone wrong. Double check that you followed the examples exactly. Maybe you missed something, or made a mistake while copying things down.
Note all of this other stuff behind the Hello World message: this part may look different, based on your version of GRUB, and also since we didn’t clear the screen, everything from GRUB just stays as it is. We’ll write a function to do that eventually...
Let’s talk about this command before we move on:
qemu-system-x86_64
We’re running the x86_64 variant of QEMU. While we have a 32-bit kernel for
now, soon we’ll have a 64-bit one. And since things are backwards compatible,
this works just fine.
-cdrom os.iso
We’re going to start QEMU with a CD-ROM drive, and its contents are the
os.iso file we made.
That’s it! Here’s the thing, though: while that wasn’t too complicated, it was a lot of steps. Each time we make a change, we have to go through all these steps over again. In the next section, we’ll use Make to do all these steps for us.
Automation with Make
Typing all of these commands out every time we want to build the project is
tiring and error-prone. It’s nice to be able to have a single command that
builds our entire project. To do this, we’ll use make. Make is a classic
bit of software that’s used for this purpose. At its core, make is fairly
simple:
- You create a file called
Makefile. - In this file, you define rules. Rules are composed of three things: targets, prerequisites, and commands.
- Targets describe what you are trying to build.
- Targets can depend on other targets being built before they can be built. These are called ‘prerequisites’.
- Commands describe what it takes to actually build the target.
Let’s start off with a very straightforward rule. Specifically, the first step
that we did was to build the Multiboot header by running nasm. Let’s build a
Makefile that does this. Open a file called Makefile and put this in it:
multiboot_header.o: multiboot_header.asm
        nasm -f elf64 multiboot_header.asm
It’s very important that that nasm line uses a tab to indent. It can’t be
spaces. It has to be a tab. Yay legacy software!
Let’s try to run it before we talk about the details:
$ make
nasm -f elf64 multiboot_header.asm
$
If you see this output, success! Let’s talk about this syntax:
target: prerequisites
        command
The bit before the colon is called a ‘target’. That’s the thing we’re trying to
build. In this case, we want to create the multiboot_header.o file, so we name
our target after that.
After the colon comes the ‘prerequisites’. This is a list of other targets that must
be built for this target to be built. In this case, building multiboot_header.o
requires that we have a multiboot_header.asm. We have no rule describing how
to build this file but it existing is enough to satisfy the dependency.
Finally, on the next line, and indented by a tab, we have a ‘command’. This is the shell command that you need to build the target.
Building boot.o is similar:
multiboot_header.o: multiboot_header.asm
        nasm -f elf64 multiboot_header.asm

boot.o: boot.asm
        nasm -f elf64 boot.asm
Let’s try to build it:
$ make
make: ‘multiboot_header.o’ is up to date.
$
Wait a minute, what? There’s two things going on here. The first is that make will build
the first target that you list by default. So a simple make will not build boot.o. To
build it, we can pass make the target name:
$ make boot.o
nasm -f elf64 boot.asm
Okay, so that worked. But what about this ‘is up to date’ bit?
By default, make will keep track of the last time you built a particular
target, and check the prerequisites’ last-modified-time against that time. If
the prerequisites haven’t been updated since the target was last built, then it
won’t re-execute the build command. This is a really powerful feature,
especially as we grow. You don’t want to force the entire project to re-build
just because you edited one file; it’s nicer to only re-build the bits that
interact with it directly. A lot of the skill of make is defining the right
targets to make this work out nicely.
It would be nice if we could build both things with one command, but as it
turns out, our next target, kernel.bin, relies on both of these .o files,
so let’s write it first:
multiboot_header.o: multiboot_header.asm
        nasm -f elf64 multiboot_header.asm

boot.o: boot.asm
        nasm -f elf64 boot.asm

kernel.bin: multiboot_header.o boot.o linker.ld
        ld -n -o kernel.bin -T linker.ld multiboot_header.o boot.o
Let’s try building it:
$ make kernel.bin
ld -n -o kernel.bin -T linker.ld multiboot_header.o boot.o
Great! The kernel.bin target depends on multiboot_header.o, boot.o, and linker.ld. The
first two are the previous targets we defined, and linker.ld is a file on its own.
Let’s make make build the whole thing by default:
default: kernel.bin

multiboot_header.o: multiboot_header.asm
        nasm -f elf64 multiboot_header.asm

boot.o: boot.asm
        nasm -f elf64 boot.asm

kernel.bin: multiboot_header.o boot.o linker.ld
        ld -n -o kernel.bin -T linker.ld multiboot_header.o boot.o
We can name targets whatever we want. In this case, default is a good
convention for the first rule, as it’s the default target. It relies on
the kernel.bin target, which means that we’ll build it, and as we previously
discussed, kernel.bin will build our two .os.
Let’s try it out:
$ make
make: Nothing to be done for ‘default’.
We haven’t edited our files, so everything is built. Let’s modify one. Open up
multiboot_header.asm in your editor, save it, and then run make:
$ make
nasm -f elf64 multiboot_header.asm
ld -n -o kernel.bin -T linker.ld multiboot_header.o boot.o
It re-built multiboot_header.o, and then kernel.bin. But it didn’t rebuild
boot.o, as we didn’t modify it at all.
Let’s add a new rule to build our iso. Rather than show the entire Makefile, I’m
going to start showing you what’s changed. First, we have to update our default
target, and then we have to write the new one:
default: os.iso

os.iso: kernel.bin grub.cfg
        mkdir -p isofiles/boot/grub
        cp grub.cfg isofiles/boot/grub
        cp kernel.bin isofiles/boot/
        grub-mkrescue -o os.iso isofiles
This is our first multi-command rule. make will execute all of the commands
that you list. In this case, to build the ISO, we need to create our isofiles
directory, and then copy grub.cfg and kernel.bin into the right place
inside of it. Finally, grub-mkrescue builds the ISO from that directory.
This rule assumes that grub.cfg is at our top-level directory, but it’s
currently in isofiles/boot/grub already. So let’s copy it out:
$ cp isofiles/boot/grub/grub.cfg .
And now we can build:
$ make
mkdir -p isofiles/boot/grub
cp grub.cfg isofiles/boot/grub
cp kernel.bin isofiles/boot/
grub-mkrescue -o os.iso isofiles
Sometimes, it’s nice to add targets which describe a semantic. In this case, building
the os.iso target is the same as building the project. So let’s say so:
default: build

build: os.iso
The default action is to build the project, and to build the project, we need to build
os.iso. But what about running it? Let’s add a rule for that:
default: run

run: os.iso
        qemu-system-x86_64 -cdrom os.iso
You can choose the default here: do you want the default to be build, or run? Here’s what each looks like:
$ make     # build is the default
$ make run
or
$ make       # run is the default
$ make build
I prefer to make run the default.
Finally, there’s another useful common rule: clean. The clean rule should remove all
of the generated files, and allow us to do a full re-build. As such it’s a bunch of rm
statements:
clean:
        rm -f multiboot_header.o
        rm -f boot.o
        rm -f kernel.bin
        rm -rf isofiles
        rm -f os.iso
Now there's just one more wrinkle. We have four targets that aren't really files
on disk, they are just actions: default, build, run and clean. Remember
we said earlier that make decides whether or not to execute a command by
comparing the last time a target was built with the last-modified-time of its
prerequisites? Well, it determines the last time a target was built by looking
at the last-modified-time of the target file. If the target file doesn't exist,
then it's definitely out-of-date so the command will be run.
But what if we accidentally create a file called clean? It doesn't have any
prerequisites so it will always be up-to-date and the commands will never be
run! We need a way to tell make that this is a special target, it isn't really
a file on disk, it's an action that should always be executed. We can do this
with a magic built-in target called .PHONY:
.PHONY: default build run clean
Here’s our final Makefile:
default: run

.PHONY: default build run clean

multiboot_header.o: multiboot_header.asm
        nasm -f elf64 multiboot_header.asm

boot.o: boot.asm
        nasm -f elf64 boot.asm

kernel.bin: multiboot_header.o boot.o linker.ld
        ld -n -o kernel.bin -T linker.ld multiboot_header.o boot.o

os.iso: kernel.bin grub.cfg
        mkdir -p isofiles/boot/grub
        cp grub.cfg isofiles/boot/grub
        cp kernel.bin isofiles/boot/
        grub-mkrescue -o os.iso isofiles

build: os.iso

run: os.iso
        qemu-system-x86_64 -cdrom os.iso

clean:
        rm -f multiboot_header.o
        rm -f boot.o
        rm -f kernel.bin
        rm -rf isofiles
        rm -f os.iso
You'll notice that there is a fair amount of repetition here. At first, that's pretty okay: make can be a bit hard to understand, and while it has features that let you de-duplicate things, they can also get unreadable really fast.
Creating a build subdirectory
Here's one example of a tweak we can do: nasm supports a -o flag, which
controls the name of the output file. We can use this to build everything in
a build subdirectory. This is nice for a number of reasons, but one of the
simplest is that all of our generated files will go in a single directory,
which means that it’s much easier to keep track of them: they’ll all be in one
place.
Let’s make some changes: More specifically, three of them:
build/multiboot_header.o: multiboot_header.asm
        mkdir -p build
        nasm -f elf64 multiboot_header.asm -o build/multiboot_header.o
The first one is the name of the rule. We have to add a build/ in front of
the filename. This is because we’re going to be putting this file in that
directory now.
Second, we added another line: mkdir. We used -p to make directories
before, but in this case, the purpose of the flag is to not throw an error
if the directory already exists. We need to try to make this directory
when we build so that we can put our .o file in it!
Finally, we add the -o flag to nasm. This will create our output file in
that build directory, rather than in the current one.
With that, we’re ready to modify boot.o as well:
build/boot.o: boot.asm
        mkdir -p build
        nasm -f elf64 boot.asm -o build/boot.o
These changes are the same, just with boot instead of multiboot_header.
Next up: kernel.bin:
build/kernel.bin: build/multiboot_header.o build/boot.o linker.ld
        ld -n -o build/kernel.bin -T linker.ld build/multiboot_header.o build/boot.o
We add build in no fewer than six places. Whew! At least it’s
straightforward.
build/os.iso: build/kernel.bin grub.cfg
        mkdir -p build/isofiles/boot/grub
        cp grub.cfg build/isofiles/boot/grub
        cp build/kernel.bin build/isofiles/boot/
        grub-mkrescue -o build/os.iso build/isofiles
Seeing a pattern yet? More prefixing.
run: build/os.iso
        qemu-system-x86_64 -cdrom build/os.iso
... and here as well.
clean:
        rm -rf build
Now some payoff! To get rid of our generated files, all we have to do is rm
our build directory. Much easier.
Here’s our final version:
default: run

.PHONY: default build run clean

build/multiboot_header.o: multiboot_header.asm
        mkdir -p build
        nasm -f elf64 multiboot_header.asm -o build/multiboot_header.o

build/boot.o: boot.asm
        mkdir -p build
        nasm -f elf64 boot.asm -o build/boot.o

build/kernel.bin: build/multiboot_header.o build/boot.o linker.ld
        ld -n -o build/kernel.bin -T linker.ld build/multiboot_header.o build/boot.o

build/os.iso: build/kernel.bin grub.cfg
        mkdir -p build/isofiles/boot/grub
        cp grub.cfg build/isofiles/boot/grub
        cp build/kernel.bin build/isofiles/boot/
        grub-mkrescue -o build/os.iso build/isofiles

run: build/os.iso
        qemu-system-x86_64 -cdrom build/os.iso

build: build/os.iso

clean:
        rm -rf build
We can go further, and eventually, we will. But this is good enough for now. Like I said, there’s a fine balance between keeping it DRY and making it non-understandable.
Luckily, we’ll only be using Make for these assembly files. Rust has its own build tool, Cargo, that we’ll integrate with Make. It’s a lot easier to use.
Transitioning to Long Mode
We now have our little kernel in protected mode. But we’re making a 64-bit kernel here, so we need to transition from protected mode to ‘long mode’. This takes a sequence of steps. After this, the next step is calling into Rust code!
Paging
At the end of the last chapter, we did a lot of work that wasn’t actually writing kernel code. So let’s review what we’re up to:
- GRUB loaded our kernel, and started running it.
- We’re currently running in ‘protected mode’, a 32-bit environment.
- We want to transition to ‘long mode’, the 64-bit environment.
- In order to do that, we have to do some work.
We’re on step four. More specifically, here’s what we have to do:
- Set up something called ‘paging’.
- Set up something called a ‘GDT’.
- Jump to long mode.
This section covers step one. The next two will cover the other two steps. Afterwards, we’ll be ready to stop writing assembly and start writing Rust!
By the way...
There’s something we’re going to skip here, which we’d want to do in a more serious kernel: check to make sure that our hardware can actually do this! We’re going to just assume that our ‘hardware’ can run in 64-bit mode, because we’re running our OS in QEMU, which supports all of these operations. But if we were to run our OS on a real 32-bit computer, it would end up crashing. We could check that it’s possible, and then print a nice error message instead. But, we won’t cover that here. It’s not particularly interesting, and we know that it will never fail. But it might be something you want to explore on your own, for extra credit.
Paging
So, step one: set up ‘paging’. What is paging? Paging is a way of managing memory. Our computer has memory, and we can think of memory as being a big long list of cells:
| address | value |
|---|---|
| 0x00 | 0 |
| 0x01 | 0 |
| 0x02 | 0 |
| 0x03 | 0 |
| 0x04 | 0 |
| ... |
Each location in memory has an address, and we can use the address to distinguish between the cells: the value at cell zero, the value at cell ten.
But how many cells are there? This question has two answers: The first answer is how much physical memory (RAM) do we have in our machine? This will vary per machine. My machine has 8 gigabytes of memory or 8,589,934,592 bytes. But maybe your machine has 4 gigabytes of memory, or sixteen gigabytes of memory.
The second answer to how many cells there are is how many addresses can be used to refer to cells of memory? To answer that we need to figure out how many different unique numbers we can make. In 64-bit mode, we can create as many addresses as can be expressed by a 64-bit number. So that means we can make addresses from zero to (2^64) - 1. That’s 18,446,744,073,709,551,616 addresses! We sometimes refer to a sequence of addresses as an ‘address space’, so we might say “The full 64-bit address space has 2^64 addresses.”
So now we have an imbalance. We have only roughly 8.5 billion actual physical memory slots in an 8GB machine but quintillions of possible addresses we can make.
How can we resolve this imbalance? We don't want to be able to address memory that doesn't exist!
Here’s the strategy: we introduce two kinds of addresses: physical addresses and virtual addresses. A physical address is the actual, real value of a location in the physical RAM in the machine. A virtual address is an address anywhere inside of our 64-bit address space: the full range. To bridge between the two address spaces, we can map a given virtual address to a particular physical address. So we might say something like “virtual address 0x044a maps to the physical address 0x0011.” Software uses the virtual addresses, and the hardware uses physical addresses.
Mapping each individual address would be extremely inefficient; we would need to keep track of literally every memory address and where it points to. Instead, we split up memory into chunks, also called ‘pages’, and then map each page to an equal sized chunk of physical memory.
By the way... In the future we'll be using paging to help us implement something called "virtual memory". Besides helping us always be able to map a 64-bit number to a real place in physical memory, "virtual memory" is useful for other reasons. These reasons don't really come into play at this point, so we'll hold off on discussing them. For now, it's just important to know that we need paging to enter 64-bit long mode and that it's a good idea for many reasons including helping us resolve the fact the we have way less actual memory than possible addresses to refer to that memory.
Paging is actually implemented by a part of the CPU called an ‘MMU’, for ‘memory management unit’. The MMU will translate virtual addresses into their respective physical addresses automatically; we can write all of our software with virtual addresses only. The MMU does this with a data structure called a ‘page table’. As an operating system, we load up the page table with a certain data structure, and then tell the CPU to enable paging. This is the task ahead of us; it’s required to set up paging before we transition to long mode.
How should we do our mapping of physical to virtual addresses? You can make this easy, or complex, and it depends on exactly what you want your OS to be good at. Some strategies are better than others, depending on the kinds of programs you expect to be running. We’re going to keep it simple, and use a strategy called ‘identity mapping’. This means that every virtual address will map to a physical address of the same number. Nothing fancy.
Let’s talk more about the page table. In long mode, the page table is four levels deep, and each page is 4096 bytes in size. What do I mean by levels? Here are the official names:
- the Page-Map Level-4 Table (PML4),
- the Page-Directory Pointer Table (PDP),
- the Page-Directory Table (PD),
- and the Page Table (PT).
I’ve most commonly heard them referred to as a “level x page table”, where x
goes from four to one. So the PML4 is a “level four page table,” and the PT is
a “level one page table.” They’re called ‘levels’ because they decend in order:
each entry in a level 4 page table points to a level 3 page table entry. Each
level 3 page table entry points at a level 2 page table entry, and each level 2
page table entry points at a level 1 page table entry. That entry then contains
the address. Whew! To get started, we only need one entry of each table.
Creating the page table
So here’s the strategy: create a single entry of each of these tables, then point them at each other in the correct way, then tell the CPU that paging should be enabled.
How many tables?
The number of tables we need depends on how big we make each page. The bigger each page, the fewer pages fit into the virtual address space, so the fewer tables we need. How to choose a page size is the kind of detail we don't need to worry about for now. We're just going to go for 2 MiB pages, which means we only need three tables: we won't need a level 1 page table.
Creating page table entries
To create space for these page table entries, open up boot.asm and add these
lines at the bottom:
section .bss

align 4096

p4_table:
    resb 4096
p3_table:
    resb 4096
p2_table:
    resb 4096
We introduce a new section, ‘bss’. It stands for ‘block started by symbol’, and was introduced in the 1950s. The name doesn’t make much sense anymore, but the reason we use it is because of its behavior: entries in the bss section are automatically set to zero by the linker. This is useful, as we only want certain bits set to 1, and most of them set to zero.
The resb directive reserves bytes; we want to reserve space for each entry.
The align directive makes sure that we’ve aligned our tables properly. We
haven’t talked much about alignment yet: the idea is that the addresses here
will be set to a multiple of 4096, hence ‘aligned’ to 4096 byte chunks. We’ll
eventually talk more about alignment and why it’s important, but it doesn’t
matter a ton right now.
After this has been added, we have a single valid entry for each level. However, because our page four entry is all zeroes, we have no valid pages. That’s not super useful. Let’s set things up properly.
Pointing the entries at each other
In order to do this setup, we need to write some more assembly code! Open up
boot.asm. You can either leave in printing code, or remove it. If you do leave
it in, add this code before it: that way, if you see your message print out, you
know it ran successfully.
global start

section .text
bits 32
start:
    ; Point the first entry of the level 4 page table to the first entry in the
    ; p3 table
    mov eax, p3_table
    or eax, 0b11
    mov dword [p4_table + 0], eax
If you recall, ; are comments. Leaving yourself excessive comments in assembly
files is a good idea. Let’s go over each of these lines:
mov eax, p3_table
This copies the contents of the first third-level page table entry into the
eax register. We need to do this because of the next line:
or eax, 0b11
We take the contents of eax and or it with 0b11, the result is written in eax. First, let’s talk about
what this does, and then we’ll talk about why we want to do it.
When dealing with binary, or is an operation that returns 1 if either value
is 1, and 0 if both are 0. In other words, if a and b are a single
binary digit:
| a | 0 | 1 | 0 | 1 |
| b | 0 | 0 | 1 | 1 |
| or a b | 0 | 1 | 1 | 1 |
You’ll see charts like this a lot when talking about binary stuff. You can read
this chart from top to bottom, each column is a case. So the first column says
“if a is zero and b is zero, or a b will be zero.” The second column says
“if a is one and b is zero, or a b will be one.” And so on.
So when we or with 0b11, it means that the first two bits will be set to
one, leaving the rest as they were.
Okay, so now we know what we are doing, but why? Each entry in a page table contains an address, but it also contains metadata about that page. The first two bits are the ‘present bit’ and the ‘writable bit’. By setting the first bit, we say “this page is currently in memory,” and by setting the second, we say “this page is allowed to be written to.” There are a number of other settings we can change this way, but they’re not important for now.
By the way...
You might be wondering, if the entry in the page table is an address, how can we use some of the bits of that address to store metadata without messing up the address? Remember that we used the
aligndirective to make sure that the page tables all have addresses that are multiples of 4096. That means that the CPU can assume that the first 12 bits of all the addresses are zero. If they're always implicitly zero, we can use them to store metadata without changing the address.
Now that we have an entry set up properly, the next line is of interest:
mov dword [p4_table + 0], eax
Another mov instruction, but this time, copying eax, where we’ve been
setting things up, into... something in brackets. [] means, “I will be giving
you an address between the brackets. Please do something at the place this
address points.” In other words, [] is like a dereference operator.
Now, the address we’ve put is kind of funny looking: p4_table + 0. What’s up
with that + 0? It’s not strictly needed: adding zero to something keeps it the
same. However, it’s intended to convey to the reader that we’re accessing the
zeroth entry in the page table. We’re about to see some more code later where we
will do something other than add zero, and so putting it here makes our code
look more symmetric overall. If you don’t like this style, you don’t have to put
the zero.
These few lines form the core of how we’re setting up these page tables. We’re going to do the same thing over again, with slight variations.
Here’s the full thing again:
    ; Point the first entry of the level 4 page table to the first entry in the
    ; p3 table
    mov eax, p3_table
    or eax, 0b11 ;
    mov dword [p4_table + 0], eax
Once you feel like you’ve got a handle on that, let’s move on to pointing the page three table to the page two table!
    ; Point the first entry of the level 3 page table to the first entry in the
    ; p2 table
    mov eax, p2_table
    or eax, 0b11
    mov dword [p3_table + 0], eax
The code is the same as above, but with p2_table and p3_table instead of
p3_table and p4_table. Nothing more than that.
We have one last thing to do: set up the level two page table to have valid references to pages. We’re going to do something we haven’t done yet in assembly: write a loop!
Here’s the basic outline of loop in assembly:
- Create a counter variable to track how many times we’ve looped
- make a label to define where the loop starts
- do the body of the loop
- add one to our counter
- check to see if our counter is equal to the number of times we want to loop
- if it’s not, jump back to the top of the loop
- if it is, we’re done
It’s a little more detail-oriented than loops in other languages. Usually, you have curly braces or indentation to indicate that the body of the loop is separate, but we don’t have any of those things here. We also have to write the code to increment the counter, and check if we’re done. Lots of little fiddly bits. But that’s the nature of what we’re doing!
Let’s get to it!
    ; point each page table level two entry to a page
    mov ecx, 0         ; counter variable
In order to write a loop, we need a counter. ecx is the usual loop counter
register, that’s what the c stands for: counter. We also have a comment
indicating what we’re doing in this part of the code.
Next, we need to make a new label:
.map_p2_table:
As we mentioned above, this is where we will loop back to when the loop continues.
mov eax, 0x200000 ; 2MiB
We’re going to store 0x200000 in eax, or 2,097,152 which is equivalent to 2 MiB.
Here’s the reason: each page is two megabytes in size. So in order to get the
right memory location, we will multiply the number of the loop counter by 0x200000:
| counter | 0 | 1 | 2 | 3 | 4 |
| 0x200000 | 0x200000 | 0x200000 | 0x200000 | 0x200000 | 0x020000 |
| multiplied | 0 | 0x200000 | 0x400000 | 0x600000 | 0x800000 |
And so on. So our pages will be all next to each other, and 2,097,152 bytes in size.
mul ecx
Here’s that multiplication! mul takes just one argument, which in this case
is our ecx counter, and multiplies that by eax, storing the result in
eax. This will be the location of the next page.
or eax, 0b10000011
Next up, our friend or. Here, we don’t just or 0b11: we’re also setting
another bit. This extra 1 is a ‘huge page’ bit, meaning that the pages are
2,097,152 bytes. Without this bit, we’d have 4KiB pages instead of 2MiB pages.
mov [p2_table + ecx * 8], eax
Just like before, we are now writing the value in eax to a location. But
instead of it being just p2_table + 0, we’re adding ecx * 8. Remember, ecx
is our loop counter. Each entry is eight bytes in size, so we need to multiply
the counter by eight, and then add it to p2_table. Let’s take a closer look:
let’s assume p2_table is zero, to make the math easier:
| p2_table | 0 | 0 | 0 | 0 | 0 |
| ecx | 0 | 1 | 2 | 3 | 4 |
| ecx * 8 | 0 | 8 | 16 | 24 | 32 |
| p2_table + ecx * 8 | 0 | 8 | 16 | 24 | 32 |
We skip eight spaces each time, so we have room for all eight bytes of the page table entry.
That’s the body of the loop! Now we need to see if we need to keep looping or not:
    inc ecx
    cmp ecx, 512
    jne .map_p2_table
The inc instruction increments the register it’s given by one. ecx is our
loop counter, so we’re adding to it. Then, we ‘compare’ with cmp. We’re
comparing ecx with 512: we want to map 512 page entries overall. The page
table is 4096 bytes, each entry is 8 bytes, so that means there are 512 entries.
This will give us 512 * 2 mebibytes: one gibibyte of memory. It’s also why we
wrote the loop: writing out 512 entries by hand is possible, theoretically, but
is not fun. Let’s make the computer do the math for us.
The jne instruction is short for ‘jump if not equal’. It checks the result of
the cmp, and if the comparison says ‘not equal’, it will jump to the label
we’ve defined. map_p2_table points to the top of the loop.
That’s it! We’ve written our loop and mapped our second-level page table. Here’s the full code of the loop:
    ; point each page table level two entry to a page
    mov ecx, 0         ; counter variable
.map_p2_table:
    mov eax, 0x200000  ; 2MiB
    mul ecx
    or eax, 0b10000011
    mov [p2_table + ecx * 8], eax

    inc ecx
    cmp ecx, 512
    jne .map_p2_table
And, with this, we’ve now fully mapped our page table! We’re one step closer to being in long mode. Here’s the full code, all in one place:
    ; Point the first entry of the level 4 page table to the first entry in the
    ; p3 table
    mov eax, p3_table
    or eax, 0b11 ;
    mov dword [p4_table + 0], eax

    ; Point the first entry of the level 3 page table to the first entry in the
    ; p2 table
    mov eax, p2_table
    or eax, 0b11
    mov dword [p3_table + 0], eax

    ; point each page table level two entry to a page
    mov ecx, 0         ; counter variable
.map_p2_table:
    mov eax, 0x200000  ; 2MiB
    mul ecx
    or eax, 0b10000011
    mov [p2_table + ecx * 8], eax

    inc ecx
    cmp ecx, 512
    jne .map_p2_table
Now that we’ve done this, we have a valid initial page table. Time to enable paging!
Enable paging
Now that we have a valid page table, we need to inform the hardware about it. Here’s the steps we need to take:
- We have to put the address of the level four page table in a special register
- enable ‘physical address extension’
- set the ‘long mode bit’
- enable paging
These four steps are not particularly interesting, but we have to do them. First, let’s do the first step:
    ; move page table address to cr3
    mov eax, p4_table
    mov cr3, eax
So, this might seem a bit redundant: if we put p4_table into eax, and then
put eax into cr3, why not just put p4_table into cr3? As it turns out,
cr3 is a special register, called a ‘control register’, hence the cr. The
cr registers are special: they control how the CPU actually works. In our
case, the cr3 register needs to hold the location of the page table.
Because it’s a special register, it has some restrictions, and one of those is
that when you mov to cr3, it has to be from another register. So we need the
first mov to set p4_table in a register before we can set cr3.
Step one: done!
Next, enabling ‘physical address extension’:
    ; enable PAE
    mov eax, cr4
    or eax, 1 << 5
    mov cr4, eax
In order to set PAE, we need to take the value in the cr4 register and
modify it. So first, we mov it into eax, then we use or to change the
value. What about 1 << 5? The << is a ‘left shift’. It might be easier to
show you with a table:
| value | |
|---|---|
| 1 | 000001 |
| << 1 | 000010 |
| << 2 | 000100 |
| << 3 | 001000 |
| << 4 | 010000 |
| << 5 | 100000 |
See how the 1 moves left? So 1 << 5 is 100000 (or 2^5 if you like maths; incidentally 1<<n = 2^n). If you only need to set one
bit, this can be easier than writing out 100000 itself, as you don’t need to
count the zeroes.
After we modify eax to have this bit set, we mov the value back into cr4.
PAE has been set! Why is this what you need to do? It just is. The details are
not really in the scope of this tutorial.
Okay, so we have step two done. Time for step three: setting the long mode bit:
    ; set the long mode bit
    mov ecx, 0xC0000080
    rdmsr
    or eax, 1 << 8
    wrmsr
The rdmsr and wrmsr instructions read and write to a ‘model specific
register’, hence msr. This is just what you have to do to set this up. Again,
we won’t get into too much detail, as it’s not very interesting. Boilerplate.
Finally we are all ready to enable paging!
    ; enable paging
    mov eax, cr0
    or eax, 1 << 31
    or eax, 1 << 16
    mov cr0, eax
cr0 is the register we need to modify. We do the usual “move to eax, set
some bits, move back to the register” pattern. In this case, we set bit 31 and
bit 16.
Once we’ve set these bits, we’re done! Here’s the full code listing:
    ; move page table address to cr3
    mov eax, p4_table
    mov cr3, eax

    ; enable PAE
    mov eax, cr4
    or eax, 1 << 5
    mov cr4, eax

    ; set the long mode bit
    mov ecx, 0xC0000080
    rdmsr
    or eax, 1 << 8
    wrmsr

    ; enable paging
    mov eax, cr0
    or eax, 1 << 31
    or eax, 1 << 16
    mov cr0, eax
... are we in long mode yet?
So, technically after paging is enabled, we are in long mode. But we’re not in real long mode; we’re in a special compatibility mode. To get to real long mode, we need a data structure called a ‘global descriptor table’. Read the next section to find out how to make one of these.
Setting up a GDT
We’re so close! We’re currently in long mode, but not ‘real’ long mode. We need to go from this ‘compatibility mode’ to honest-to-goodness long mode. To do this, we need to set up a ‘global descriptor table’.
This table, also known as a GDT, is kind of vestigial. The GDT is used for a style of memory handling called ‘segmentation’, which is in contrast to the paging model that we just set up. Even though we’re not using segmentation, however, we’re still required to have a valid GDT. Such is life.
So let’s set up a minimal GDT. Our GDT will have three entries:
- a ‘zero entry’
- a ‘code segment’
- a ‘data segment’
If we were going to be using the GDT for real stuff, it could have a number of code and data segment entries. But we need at least one of each to have a minimum viable table, so let’s get to it!
The Zero entry
The first entry in the GDT is special: it needs to be a zero value. Add this
to the bottom of boot.asm:
section .rodata
gdt64:
    dq 0
We have a new section: rodata. This stands for ‘read only data’, and since
we’re not going to modify our GDT, having it be read-only is a good idea.
Next, we have a label: gdt64. We’ll use this label later, to tell the hardware
where our GDT is located.
Finally, dq 0. This is ‘define quad-word’, in other words, a 64-bit value.
Given that it’s a zero entry, it shouldn’t be too surprising that the value of
this entry is zero!
That’s all there is to it.
Setting up a code segment
Next, we need a code segment. Add this below the dq 0:
.code: equ $ - gdt64
    dq (1<<44) | (1<<47) | (1<<41) | (1<<43) | (1<<53)
Let's talk about the dq line first. If you recall from the last section,
1<<44 means ‘left shift one 44 places’, which sets the 44th bit. But what
about |? This means or. So, if we or a bunch of these values together,
we’ll end up with a value that has the 44th, 47th, 41st, 43rd, and 53rd bit
set.
Why | and not or, like before? Well, here, we’re not running assembly
instructions: we’re defining some data. So there’s no instruction to execute, so
the language used is a bit different.
Finally, why these bits? Well, as we’ve seen with other table entries, each bit has a meaning. Here’s a summary:
- 44: ‘descriptor type’: This has to be
1for code and data segments - 47: ‘present’: This is set to
1if the entry is valid - 41: ‘read/write’: If this is a code segment,
1means that it’s readable - 43: ‘executable’: Set to
1for code segments - 53: ‘64-bit’: if this is a 64-bit GDT, this should be set
That’s all we need for a valid code segment!
Oh, but let's not forget about the other line:
.code: equ $ - gdt64
What's up with this? So, in a bit, we'll need to reference this entry somehow.
But we don't reference the entry by its address, we reference it by an offset.
If we needed just an address, we could use code:. But we can't, so we need
more. Also, note that period at the start, it's .code:. This tells the
assembler to scope this label under the last label that appeared, so we'll
say gdt64.code rather than just code. Some nice encapsulation.
So that's what's up with the label, but we still have this equ $ - gdt64 bit.
$ is the current position. So we're subtracting the address of gdt64 from
the current position. Conveniently, that's the offset number we need for later:
how far is this segment past the start of the GDT. The equ sets the address
for the label; in other words, this line is saying "set the .code label's
value to the current address minus the address of gdt64". Got it?
Setting up a data segment
Below the code segment, add this for a data segment:
.data: equ $ - gdt64
    dq (1<<44) | (1<<47) | (1<<41)
We need less bits set for a data segment. But they’re ones we covered before.
The only difference is bit 41; for data segments, a 1 means that it’s
writable.
We also use the same trick again with the labels, calculating the offset with
equ.
Putting it all together
Here’s our whole GDT:
section .rodata
gdt64:
    dq 0
.code: equ $ - gdt64
    dq (1<<44) | (1<<47) | (1<<41) | (1<<43) | (1<<53)
.data: equ $ - gdt64
    dq (1<<44) | (1<<47) | (1<<41)
We’re so close! Now, to tell the hardware about our GDT. There’s a special
assembly instruction for this: lgdt. But it doesn’t take the GDT itself; it
takes a special structure: two bytes for the length, and eight bytes for the
address. So we have to set that up.
Below these dqs, add this:
.pointer:
    dw .pointer - gdt64 - 1
    dq gdt64
To calculate the length, we take the value of this new label, pointer, and
subtract the value of gdt64, and then subtract one more. We could calculate
this length manually, but if we do it this way, if we add another GDT entry for
some reason, it will automatically correct itself, which is nice.
The dq here has the address of our table. Straightforward.
Load the GDT
So! We’re finally ready to tell the hardware about our GDT. Add this line after all of the paging stuff we did in the last chapter:
lgdt [gdt64.pointer]
We pass lgdt the value of our pointer label. lgdt stands for ‘load global
descriptor table’. That’s it!
We have all of the prerequisites done! In the next section, we will complete our transition by jumping to long mode.
Jumping headlong into long mode
We are so close to Rust! Just a little bit of assembly code needed.
Our last task is to update several special registers called 'segment registers'. Again, we're not using segmentation, but things won't work unless we set them properly. Once we do, we'll be out of the compatibility mode and into long mode for real.
Updating the first three registers is easy:
; update selectors
mov ax, gdt64.data
mov ss, ax
mov ds, ax
mov es, ax
Here's a short rundown of these registers:
ax: This isn't a segment register. It's a sixteen-bit register. Remember 'eax' from our loop accumulator? The 'e' was for 'extended', and it's the thirty-two bit version of theaxregister. The segment registers are sixteen bit values, so we start off by putting the data part of our GDT into it, to load into all of the segment registers.ss: The 'stack segment' register. We don't even have a stack yet, that's how little we're using this. Still needs to be set.ds: the 'data segment' register. This points to the data segment of our GDT, which is conveniently what we loaded intoax.es: an 'extra segment' register. Not used, still needs to be set.
There's one more register which needs to be updated, however: the code segment
register, cs. Should be an easy mov cs, ax, right? Wrong! It's not that easy.
Unfortunately, we can't modify the code segment register ourselves, or bad
things can happen. But we need to change it. So what do we do?
The way to change cs is to execute what's called a 'far jump'. Have you heard
of goto? A jump is just like that; we used one to do our little loop when
setting up paging. A 'far jump' is a jump instruction that goes really far.
That's a little bit simplistic, but the full technical details involve stuff
about memory segmentation, which again, we're not using, so going into them
doesn't matter.
Here's the line to make our far jump:
; jump to long mode!
jmp gdt64.code:long_mode_start
Previously, when we used jne to set up paging, we passed it a label to jump
to. We're doing the same here, but this time, the label is long_mode_start.
We'll define that in a minute. Before we do, we should talk about the other
part of this instruction: gdt64.code:. This is another label, the one to
the code entry of our GDT. This foo:bar syntax is what makes this a long
jump; we're also providing our GDT entry when we jump. When we execute this,
it will then update the code selector register with our entry in the GDT!
I've always loved this part of the boot process. It's very visual for me; your OS makes a long leap of faith, and comes out the other side realizing that it has more abilities than it thought! A classic tale of bravery.
But where is this long_mode_start that we're jumping to? Why, defined at
the bottom of our file, of course! Put this at the end of boot.asm:
section .text
bits 64
long_mode_start:

    hlt
A new section! It's another text section, like the rest of our code. But
there's a new bits 64 declaration: we're in honest-to-goodness 64-bit mode
now!
Finally, we have our long_mode_start label, and then a humble hlt
instruction to stop execution.
With this set up, we are now officially in long mode! Congrats! Let's do a small thing to prove it. Modify this code to look like this:
long_mode_start:

    mov rax, 0x2f592f412f4b2f4f
    mov qword [0xb8000], rax

    hlt
We have a new fancy register, rax! Like eax is a 32-bit version of ax,
rax is a 64-bit version of eax. The 'e' in eax stood for 'extended', the
'r' in rax stands for... register. Can't make this stuff up.
Anyway, we put a mystery sixty-four-bit value into rax, and then write it
into 0xb8000. If you recall from earlier, that's the upper-left part of the
screen. The qword bit stands for 'quad-word', aka, 64-bit. A word is 16 bits,
a double word is 32 bits, so a quad word is 64 bits.
What does it say? Well, you'll have to run it and find out. 😊
Our next step is going to be a big one: moving to writing Rust code! I hope you've enjoyed this tour of assembly and legacy computer junk. You've made it through the toughest bits: getting started is the hardest part.
A Rust kmain()
At long last, we're ready to move on to some Rust code! This is ostensibly a "write a kernel in Rust" tutorial, but we haven't gotten to any Rust code yet. We're out of the woods with assembly; at least for a while. We'll be writing a bit more in the future, but for now, let's forget about all of that.
Creating our first crate
Now that we've got Rust installed, time to write some Rust code! rustup has
also installed Cargo for us, Rust's build tool and package manager. Generate
a new Cargo package like this:
$ cargo init --name intermezzos --lib
This will create a new package called 'intermezzos' in the current directory.
We have some new files. First, Cargo.toml:
[package]
name = "intermezzos"
version = "0.1.0"
authors = ["Your Name <you@example.com>"]

[dependencies]
This file sets overall configuration for the package. You'll see your
information under authors, Cargo pulls it in from git, if you use it.
Otherwise, you can add it yourself, no big deal.
Next, src/lib.rs:
# #![allow(unused_variables)]
#fn main() {
#[cfg(test)]
mod tests {
    #[test]
    fn it_works() {
    }
}
#}
Cargo has generated us a sample test suite. We don't need any of this though; we won't be doing testing just yet. Let's try building the project:
$ cargo build
   Compiling intermezzos v0.1.0 (file:///path/to/your/kernel)
After this builds, we have one new file, Cargo.lock. What's in it isn't a big
deal; Cargo uses the file to pin our dependency versions, so its contents are
internal to Cargo.
That said, we need to make two more tweaks. Check out what's in the target
directory:
$ ls target/debug/
build  deps  examples  libintermezzos.rlib  native
Cargo has generated an .rlib, which is Rust's library format. However, we want
to generate a static library instead. Modify Cargo.toml to have a new section:
[package]
name = "intermezzos"
version = "0.1.0"
authors = ["Steve Klabnik <steve@steveklabnik.com>"]

[lib]
crate-type = ["staticlib"]

[dependencies]
This crate-type annotation tells Cargo we want to build a static library,
rather than the default rlib. Let's build again:
$ cargo clean
$ cargo build
   Compiling intermezzos v0.1.0 (file:///path/to/your/kernel)
note: link against the following native artifacts when linking against this static library
note: the order and any duplication can be significant on some platforms, and so may need to be preserved
note: library: dl
note: library: pthread
note: library: gcc_s
note: library: c
note: library: m
note: library: rt
note: library: util
Whew! We get some debugging output. Don't worry about that; we'll be getting rid of it in a bit. For now, though, we can see that Cargo has built the static library:
$ ls target/debug/
build  deps  examples  libintermezzos.a  native
We now have a .a file. This is exactly what we want. Also, make note of this
path: target/debug. That's where Cargo puts output for debugging builds. We
probably should use a release build instead: cargo build --release will
give us that, and put the output in target/release.
Creating a target
Remember back in the setup chapters, where we talked about hosts and targets? We need to do the equivalent for Rust. We could leave things where they are, but that would cause us problems later. So let's just get it out of the way now, while we're doing all this other setup.
Create a file named x86_64-unknown-intermezzos-gnu.json, and put this in it:
{
	"arch": "x86_64",
	"cpu": "x86-64",
	"data-layout": "e-m:e-i64:64-f80:128-n8:16:32:64-S128",
	"llvm-target": "x86_64-unknown-none-gnu",
	"linker-flavor": "gcc",
	"no-compiler-rt": true,
	"os": "intermezzos",
	"target-endian": "little",
	"target-pointer-width": "64",
	"target-c-int-width": "32",
	"features": "-mmx,-fxsr,-sse,-sse2,+soft-float",
	"disable-redzone": true,
	"eliminate-frame-pointer": false
}
Unlike gcc, where you have to build a cross-compiler by actually building a
copy of the compiler, Rust lets you cross-compile by creating one of these
"target specifications." This specification declares all of the various options
that need to be set up for this target to work.
There are two parts of this target specification I'd like to call out in general.
The first is features. We have -mmx,-sse, and such. This controls the assembly
features that we can generate, in other words, we will not be generating MMX or
SSE instructions. These handle floating point, but they're problematic in a kernel.
Basically, we don't need to use them for anything, and they make some things a
lot more difficult. For one thing, we have to explicitly enable SSE support through
some more assembly code, which is annoying, and when we deal with interrupts in a
later chapter, they'll pose some difficulty there, as well. So let's turn them off.
This isn't just a toy kernel thing; Linux also turns off SSE.
The second is disable-redzone. This is a feature of the x86_64 ABI which is
similar: it's useful for application code, but causes problems in the kernel. You
can think of the red zone as a kind of "scratch space," 128 bytes that's hidden
inside of the stack frame. We don't want any of that in our kernel, so we turn it
off.
The rest of these options aren't particularly interesting. I would tell you to go look them up in Rust's documentation, but it's sorely lacking at the moment. Maybe I should stop writing this and go work on that... anyway. I digress.
To use this target specification, we pass --target to Cargo:
$ cargo build --release --target=x86_64-unknown-intermezzos-gnu
   Compiling intermezzos v0.1.0 (file:///path/to/your/kernel)
error: can't find crate for `std` [E0463]
error: aborting due to previous error
error: Could not compile `intermezzos`.

To learn more, run the command again with --verbose.
Wait, that didn't work? If you think about it, this makes sense: we told Rust that
we wanted to compile our code for intermezzOS, but we haven't compiled a standard
library for it yet! In fact, we don't want a standard library: our operating system
is far from containing the proper features to support it. Instead, we only want
Rust's libcore library. This library contains just the essential stuff, without
all of the fancy features we can't support yet.
Building libcore with xargo
So how do we get a copy of libcore for intermezzOS? The answer is xargo. It's
a wrapper around Cargo that knows how to read a target.json file and automatically
cross-compile libcore, then set up Cargo to use it.
Let's modify src/lib.rs to get rid of that useless test, and to say we don't want to
use the standard library:
# #![allow(unused_variables)]
#![no_std]
#fn main() {
#}
That's it, just an empty library with one little annotation. Now we're ready to build. Well, almost, anyway:
$ cargo install xargo
<snip, let's not include all of this output here. It should build successfully though.>
In order for xargo to work, it needs a copy of Rust's source code; that's how it
builds a custom libcore for us. Add it with rustup:
$ rustup component add rust-src
And now let's build:
$ xargo build --release --target=x86_64-unknown-intermezzos-gnu
   Compiling sysroot for x86_64-unknown-intermezzos-gnu
   Compiling core v0.0.0 (file:///home/steve/.xargo/src/libcore)
   Compiling alloc v0.0.0 (file:///home/steve/.xargo/src/liballoc)
   Compiling rustc_unicode v0.0.0 (file:///home/steve/.xargo/src/librustc_unicode)
   Compiling rand v0.0.0 (file:///home/steve/.xargo/src/librand)
   Compiling collections v0.0.0 (file:///home/steve/.xargo/src/libcollections)
   Compiling intermezzos v0.1.0 (file:///home/steve/src/intermezzOS/kernel/chapter_05)
error: language item required, but not found: `panic_fmt`
error: language item required, but not found: `eh_personality`
error: aborting due to 2 previous errors
error: Could not compile `intermezzos`.
So why'd we get yet another error? For that, we need to understand a Rust feature, panics.
Panic == abort
The specific error we got said "language item required, but not found". Rust
lets you implement bits of itself through these language items. libcore
defines most of them, but the last two, panic_fmt and eh_personality,
need to be defined by us.
Both of these language items involve a feature of Rust called 'panics.' Here's a Rust program that panics:
fn main() {
     panic!("oh no!");
}
When the panic! macro executes, it will stop the current thread from
executing, and unwind the stack. This is something we really don't want
in a kernel. Rust lets us turn this off, though, in our Cargo.toml:
[profile.release]
panic = "abort"
By adding this to our Cargo.toml, Rust will abort when it hits a panic,
rather than unwind. That's good! However, we still need to define those
language items. Modify src/lib.rs to look like this:
#![feature(lang_items)]
#![no_std]

#[lang = "eh_personality"]
extern fn eh_personality() {
}

#[lang = "panic_fmt"]
extern fn rust_begin_panic() -> ! {
    loop {}
}
Defining language items is a nightly-only feature, so we add the ![feature]
flag to turn it on. Then, we define two functions, and annotate them with
the #[lang] attribute to inform Rust that these functions are our language
items. eh_personality() doesn't need to do anything, but rust_begin_panic()
should never return, so we put in an inifinite loop.
Let's try compiling again:
$ xargo build --release --target=x86_64-unknown-intermezzos-gnu
   Compiling intermezzos v0.1.0 (file:///path/to/your/kernel)
$
Success! We've built some Rust code, cross-compiled to our kernel, and we're ready to go.
But now, we've got all of our Rust-related stuff in src. But the rest of our
files are still strewn around in our top-level directory. Let's do a little bit
of cleaning up.
Some reorganization
We have a couple of different ways that we could re-organize the assembly
language. If we were planning on making our OS portable across architectures, a
good solution would be to move it into src/arch/arch_name. That way, we could
have src/arch/x86/, src/arch/x86_64, etc. However, we're not planning on
doing that any time soon. So let's keep it a bit simpler for now:
$ mkdir src/asm
$ mv boot.asm src/asm
$ mv multiboot_header.asm src/asm/
$ mv linker.ld src/asm/
$ mv grub.cfg src/asm/
Now, we've got everything tucked away nicely. But this has broken our build terribly:
$ make
make: *** No rule to make target 'multiboot_header.asm', needed by 'build/multiboot_header.o'.  Stop.
Let's fix up our Makefile to work again.
Fixing our Makefile
The first thing we need to do is fix up the paths:
build/multiboot_header.o: src/asm/multiboot_header.asm
        mkdir -p build
        nasm -f elf64 src/asm/multiboot_header.asm -o build/multiboot_header.o

build/boot.o: src/asm/boot.asm
        mkdir -p build
        nasm -f elf64 src/asm/boot.asm -o build/boot.o

build/kernel.bin: build/multiboot_header.o build/boot.o src/asm/linker.ld
        ld -n -o build/kernel.bin -T src/asm/linker.ld build/multiboot_header.o build/boot.o

build/os.iso: build/kernel.bin src/asm/grub.cfg
        mkdir -p build/isofiles/boot/grub
        cp src/asm/grub.cfg build/isofiles/boot/grub
        cp build/kernel.bin build/isofiles/boot/
        grub-mkrescue -o build/os.iso build/isofiles
Here, we've added src/asm/ to the start of all of the files that we moved.
This will build:
$ make
mkdir -p build
nasm -f elf64 src/asm/multiboot_header.asm -o build/multiboot_header.o
mkdir -p build
nasm -f elf64 src/asm/boot.asm -o build/boot.o
ld -n -o build/kernel.bin -T src/asm/linker.ld build/multiboot_header.o build/boot.o
$
Straightforward enough. However, now that we have Cargo, it uses the target
directory, and we're building our assembly into the build directory. Having
two places where our object files go is less than ideal. So let's change it to
output into target instead. Our Makefile will then look like this:
default: build

build: target/kernel.bin

.PHONY: default build run clean

target/multiboot_header.o: src/asm/multiboot_header.asm
        mkdir -p target
        nasm -f elf64 src/asm/multiboot_header.asm -o target/multiboot_header.o

target/boot.o: src/asm/boot.asm
        mkdir -p target
        nasm -f elf64 src/asm/boot.asm -o target/boot.o

target/kernel.bin: target/multiboot_header.o target/boot.o src/asm/linker.ld
        ld -n -o target/kernel.bin -T src/asm/linker.ld target/multiboot_header.o target/boot.o

target/os.iso: target/kernel.bin src/asm/grub.cfg
        mkdir -p target/isofiles/boot/grub
        cp src/asm/grub.cfg target/isofiles/boot/grub
        cp target/kernel.bin target/isofiles/boot/
        grub-mkrescue -o target/os.iso target/isofiles

run: target/os.iso
        qemu-system-x86_64 -cdrom target/os.iso

clean:
        rm -rf target
However, that last rule is a bit suspect. It does work just fine, make clean
will do its job. However, Cargo can do this for us, and it's a bit nicer.
Modifying the last rule, we end up with this:
default: build

build: target/kernel.bin

.PHONY: default build run clean

target/multiboot_header.o: src/asm/multiboot_header.asm
        mkdir -p target
        nasm -f elf64 src/asm/multiboot_header.asm -o target/multiboot_header.o

target/boot.o: src/asm/boot.asm
        mkdir -p target
        nasm -f elf64 src/asm/boot.asm -o target/boot.o

target/kernel.bin: target/multiboot_header.o target/boot.o src/asm/linker.ld
        ld -n -o target/kernel.bin -T src/asm/linker.ld target/multiboot_header.o target/boot.o

target/os.iso: target/kernel.bin src/asm/grub.cfg
        mkdir -p target/isofiles/boot/grub
        cp src/asm/grub.cfg target/isofiles/boot/grub
        cp target/kernel.bin target/isofiles/boot/
        grub-mkrescue -o target/os.iso target/isofiles

run: target/os.iso
        qemu-system-x86_64 -cdrom target/os.iso

clean:
        cargo clean
Not too bad! We're back where we started. Now, you may notice a bit of
repetition with our two .o file rules. We could make a lot of use of some
more advanced features of Make, and DRY our code up a little. However, it's not
that bad yet, and it's still easy to understand. Makefiles can get very
complicated, so I like to keep them simple. If you're feeling ambitious, maybe
investigating some more features of Make and tweaking this file to your liking
might be an interesting diversion.
Hello from Rust!
Okay, time for the big finale: printing our OKAY from Rust. First, let's
change our Makefile to add the Rust code into our assembly code. We can build
on the steps we did earlier. Here's a new rule to add to the Makefile:
cargo:
	xargo build --release --target x86_64-unknown-intermezzos-gnu
This uses xargo to automatically cross-compile (remember, we're trying to
compile from our OS to intermezzOS) libcore for us. Easy! Let's give it a
try:
$ make cargo
xargo build --release --target x86_64-unknown-intermezzos-gnu
 Downloading https://static.rust-lang.org/dist/2016-09-25/rustc-nightly-src.tar.gz
   Unpacking rustc-nightly-src.tar.gz
   Compiling sysroot for x86_64-unknown-intermezzos-gnu
   Compiling core v0.0.0 (file:///home/steve/.xargo/src/libcore)
   Compiling alloc v0.0.0 (file:///home/steve/.xargo/src/liballoc)
   Compiling rustc_unicode v0.0.0 (file:///home/steve/.xargo/src/librustc_unicode)
   Compiling rand v0.0.0 (file:///home/steve/.xargo/src/librand)
   Compiling collections v0.0.0 (file:///home/steve/.xargo/src/libcollections)
   Compiling intermezzos v0.1.0 (file:///home/steve/src/intermezzOS/kernel/chapter_05)
$
Success! It should all build properly. There's one more thing I'd like to note about this makefile: in a strict sense, it will try and rebuild too much. But watch what happens if we try to build a second time:
$ make cargo
xargo build --release --target x86_64-unknown-intermezzos-gnu
$
We issued some commands, but didn't actually compile anything. With this layout, we're letting Cargo worry if stuff needs to be rebuilt. This makes our Makefile a bit easier to write, and also a bit more reliable. Cargo knows what it needs to do, let's just trust it to do the right thing.
Now that we have it building, we need to modify the rule that builds the kernel
to include libintermezzos.a:
target/kernel.bin: target/multiboot_header.o target/boot.o src/asm/linker.ld cargo
        ld -n -o target/kernel.bin -T src/asm/linker.ld target/multiboot_header.o target/boot.o target/x86_64-unknown-intermezzos-gnu/release/libintermezzos.a
And then we can build:
$ make
mkdir -p target
nasm -f elf64 src/asm/multiboot_header.asm -o target/multiboot_header.o
mkdir -p target
nasm -f elf64 src/asm/boot.asm -o target/boot.o
xargo build --release --target x86_64-unknown-intermezzos-gnu
   Compiling intermezzos v0.1.0 (file:///home/steve/src/intermezzOS/kernel/chapter_05)
ld -n -o target/kernel.bin -T src/asm/linker.ld target/multiboot_header.o target/boot.o target/x86_64-unknown-intermezzos-gnu/release/libintermezzos.a
$
Hooray! We are now successfully building our assembly code and our Rust code, and then putting them together.
Now, to write our Rust. Add this function to src/lib.rs:
# #![allow(unused_variables)]
#fn main() {
#[no_mangle]
pub extern fn kmain() -> ! {

    loop { }
}
#}
This is our main function, which is traditionally called kmain(), for 'kernel
main.' We need to use the #[no_mangle] and pub extern annotations to indicate
that we're going to call this function like we would call a C function. The -> !
indicates that this function never returns. And in fact, it does not return:
the body is an infinite loop.
I'm going to pause here to mention that while I won't totally assume you're a Rust expert, this is more of an OS tutorial than a Rust tutorial. If anything about the Rust is confusing, I suggest you read over the official book to get an actual introduction to the language. It's tough enough explaining operating systems as it is without needing to fully explain a language too. But if you're an experienced programmer, you might be able to get away without it.
Anyway, our kmain() doesn't do anything. But let's try calling it anyway.
Modify src/asm/boot.asm, removing all of the long_mode_start stuff,
and changing the jmp line in start to look like this:
    ; jump to long mode!
    jmp gdt64.code:kmain
Finally, add this line to the top of the file:
extern kmain
This line says that we'll be defining kmain elsewhere: in this case, in Rust!
And so we also change our jmp to jump to kmain.
If you type make run, everything should compile and run, but then not display
anything. We didn't port over the message! Open src/lib.rs and change kmain()
to look like this:
# #![allow(unused_variables)]
#fn main() {
#[no_mangle]
pub extern fn kmain() -> ! {
    unsafe {
        let vga = 0xb8000 as *mut u64;

        *vga = 0x2f592f412f4b2f4f;
    };

    loop { }
}
#}
The first thing you'll notice is the unsafe annotation. Yes, while one of
Rust's defining features is safety, we'll certainly be making use of unsafe
in our kernel. However, we'll be using less than you think. While this is just
printing OKAY to the screen, our intermediate VGA driver will be using the
exact same amount, with a lot more safe code on top.
In this case, the reason we need unsafe is the next two lines: we create a
pointer to 0xb8000, and then write some numbers to it. Rust cannot know that
this is safe; if it did, it would have to understand that we are a kernel,
and understand the VGA specification. Having a programming language understand
VGA at that level would be a bit too much. So instead, we have to use unsafe.
Such is life.
However! We are now ready. We've worked really hard for this. Get pumped!!!
$ make run
If all goes well, this will print OKAY to your screen. But you'll have done
it with Rust! It only took us five chapters to get here!
This is just the beginning, though. At the end of the next chapter, your main function will look like this, instead:
# #![allow(unused_variables)]
#fn main() {
# #[macro_export]
# macro_rules! kprintln {
#     ($ctx:ident, $fmt:expr) => ();
# }
#
#[no_mangle]
pub extern fn kmain() -> ! {
    kprintln!(CONTEXT, "Hello, world!");

    loop { }
}
#}
But for now, kick back and enjoy what you've done. Congratulations!
Appendix A: Troubleshooting
In this appendix, we will cover common errors and their solutions for various chapters of the book.
Chapter 3
Here are various solutions to issues you may run into in Chapter 3:
The ld tool does not work
When running the linker tool ld, it may freeze and not produce output. Check the linker file for a syntax error. Make sure comments are closed. You can also run the command with --verbose for more output during linking to help in debugging.
Linux:
$ ld --verbose --nmagic --output kernel.bin --script linker.ld multiboot_header.o boot.o
Mac OS X:
$ ~/opt/bin/x86_64-pc-elf-ld --verbose --nmagic --output kernel.bin --script linker.ld multiboot_header.o boot.o
Error: no multiboot header found
When booting up your kernel, QEMU may print out a message like this:
error: no multiboot header found
error: you need to load the kernel first
This can happen for a number of reasons, but is often caused by typo-ing something. Double check your code against the examples and make sure that they’re identical, especially things like magic numbers. They’re easy to mis-type.
Could not read from CDROM (code 0009)
On a system that uses EFI to boot, you may see an error like this:
$ qemu-system-x86_64 -cdrom os.iso
Could not read from CDROM (code 0009)
The solution may be to install the grub-pc-bin package:
$ sudo apt-get install grub-pc-bin
After the install is complete, you will need to recreate the ISO file before trying QEMU again:
$ grub-mkrescue -o os.iso isofiles
$ qemu-system-x86_64 -cdrom os.iso
xorriso : FAILURE : Cannot find path ‘/efi.img’ in loaded ISO image
When building the ISO, you may see a message like this:
xorriso : FAILURE : Cannot find path ‘/efi.img’ in loaded ISO image
The solution may be to install the mtools package:
$ sudo apt-get install mtools
Could not initialize SDL(No available video device) - exiting
When booting your kernel in QEMU, you may see an error like this:
Could not initialize SDL(No available video device) - exiting
You can pass an extra flag to QEMU to not use SDL, -curses:
$ qemu-system-x86_64 -curses -cdrom os.iso
Or, try installing SDL and its development headers:
$ sudo apt-get install libsdl2-dev
Numeral Systems
In math we use a particular numeral system to denote a particular number. A numeral system is defined by the particular symbols it uses to convey numbers.
Below we'll examine three numeral systems: decimal, binary and hexadecimal.
Decimal System
The numeral system you're probably most familiar with is the decimal system.
The symbols (or "digits") used in decimal are: 0, 1, 2, 3, 4, 5,
6, 7, 8, and 9.
Decimal gets its name from the amount of unique symbols it uses to convey numbers: ten. It makes sense that we would gravitate to a system with ten unique symbols. After all, we typically have ten fingers (and ten toes).
The amount of unique symbols a numeral system uses is known as the "base" of that system (and is less often called a "radix").
Decimal is also a "positional" numeral system. Once we run out of symbols, we
begin a new "order of magnitude" over with the same symbols. For example, after
9 comes 10. We recycle the 1 and 0 symbols to express that we've cycled
through the number 1 times. When we reach 20, we want to say we've cycled
though 2 times. We start new cycles at a regular interval - every time we've
cycled through all the symbols of the digit furthest to the left.
If you're familiar with Roman numerals, you know that that system did not work that way. "Orders of magnitude" don't start and stop at regular intervals.
Let's Count
At the risk of taking things too slow, let's count in decimal the number of |s here:
||||||||||||
Let's begin with zero and go higher:
0, 1, 2, 3, 4, 5, 6, 7, 8, 9 ...
Ok we're at nine, and we've run out of symbols. No worries. We add a 1 to the
beginning to say we've already gone through one cycle of numbers, and we start
over.
... 10, 11, 12
Sorry if that was a bit too easy. You're probably pretty good with the decimal system already so this wasn't too big of a challenge. But we'll do the same exercise with other numeral systems to get a better feel for them.
Let's Use Math
We can summarize what we just said with a math formula:
\[ 1 \cdot 10^1 + 2 \cdot 10^0 = 12 \]
Here we've written out that we've cycled completely through the numbers once and then gotten through two symbols of the next cycle.
The value 120 has a 0 at position zero, a 2 at position one and a 1 at position two.
-
The
1at position two means you have counted "one" times "ten" (a.k.a the base) times all the digits (a.k.a the base) or \[ 1\cdot base \cdot base = 1 \cdot base^2 = 1 \cdot 10^2 = 100 \] When writing it as a power of the base, we can see the relation between the position of the digit and the power of the base. -
The
2at position one means you have counted two times all the digits (a.k.a the base) or \[ 2 \cdot base = 2 \cdot base^1 = 2 * 10^1 = 20 \] -
The
0at position zero means you have counted zero elements or \[ 0 = 0 \cdot base^0 = 0 \cdot 10^0 = 0 \cdot 1 = 0 \]
When we add all that up we obtain
\[ 1 \cdot base^2 + 2 \cdot base^1 + 0 \cdot base^0 = 1 \cdot 10^2 + 2 \cdot 10^1 + 0 \cdot 10^0 = 100 + 20 + 0 = 120 \]
Congrats! You've successfully converted a decimal value back into decimal - a feat that probably seems utterly useless but will come in very handy when we want to convert from some other numeral system to decimal.
Now we'll examine two new numeral systems. The are positional just like decimal, but have different bases. We'll examine binary with a base of two, and hexadecimal with a base of sixteen.
Binary system
Unlike decimal's base of ten, binary has a base of two. Meaning we only have two
symbols to work with to represent all the numbers: 0, 1. Say
goodbye to 3, 4, 5, 6, 7, 8, and 9. We can't use them.
So when we have the binary number 10 we don't have the number ten. What we've really
done is counted once through all the digits of the system 0, 1 and
started again. So we have the number two.
Let's Count
Let's count | again, but this time in binary:
|||||||
If we were counting in decimal we would use the symbol 7 to refer to this
number. Let's start at zero:
0, 1 ...
Hopefully you weren't tempted to go to 2 next! That's right, we've already
made a full round trip, so let's start over.
... 10, 11, 100, 101, 110, 111
We've successfully counted to the number seven using binary!
Let's Use Math
The binary value 100 means we have counted one times two (a.k.a the base) times
through all the digits (a.k.a. the base), which would equal to 4 in decimal.
\[1 \cdot base^2 + 0 \cdot base^1 + 0 \cdot base^0 = 1 \cdot 2^2 + 0 \cdot 2^1 + 0 \cdot 2^0 = 4 \]
Let's do one more, the binary value 1010 means we have counted one times two
(a.k.a the base) times two (a.k.a the base) times two (a.k.a the base) digits
and one times two (a.k.a the base) times two (a.k.a the base) digits.
\[ 1 \cdot base^3 + 0 \cdot base ^2 + 1 \cdot base^1 + 0 \cdot base^0 = 1 \cdot 2^3 + 0 \cdot 2^2 + 1 \cdot 2^1 + 0 \cdot 2^0 = 8 + 2 = 10\]
Hurray! We've successfully converted binary to decimal!
Hexadecimal System
And now we meet hexadecimal with a base of sixteen. Before we begin we have to answer the question of how we represent sixteen unique digits when we're used to representing only ten.
To represent the digits after 9 until a new cycle begins we'll use the letters
a through f. This is arbitrary and we could have chosen any other symbol really.
But then again it's all arbitrary. We could, for example, use the symbol } to represent
one, but we chose 1 instead.
So a in hexadecimal is equivalent to 10 in decimal, b equal to 11, etc.
The value 10 does exist in hexadecimal. It means, once again, we have counted
through all the digits of the system once and are starting the cycle again.
However, instead of it being ten, it's sixteen. Another way of thinking about
this is 10 in hexadecimal is equal to 16 in decimal.
Let's Count
Once again, let's count |s but this time using hexadecimal notation:
||||||||||||||||||||
If we were using decimal we would use the symbol 20 to refer to this number.
Let's start again at zero:
0, 1, 2, 3, 4, 5, 6, 7, 8, 9 ...
Don't be tempted to do the decimal thing and use 10!
... a, b, c, d, e, f, 10, 11, 12, 13, 14
Congrats! You've counted to twenty in hexadecimal!
Let's Use Math
Let's do the math thing one more time with an exotic hexadecimal value: 3e8.
This value means we have counted three times sixteen (a.k.a the base) times all the
digits of the system (a.k.a the base) and e times, which is equal to 14 in decimal,
all digits (a.k.a the base) and 8 remaining elements.
\[ 3 \cdot base^2 + e \cdot base^1 + 8 \cdot base^0 = 3 \cdot 16^2 + 14 \cdot 16^1 + 8 \cdot 16^0 = 768 + 224 + 8 = 1000 \]
Converting From Decimal to Another Base
Until now, we have only converted values from a numeral system with a specific base to the decimal system. But what if we want to do the opposite?
For this we are going to use the divison and remainders
Let's say we have the value 2344 and want to convert it into hexadecimal.
We are going to divide the value by the base we want to convert to. The remainder
of this operation will be our first digit (at position zero) and we are going to
repeat this operation with the result of the (integer) division.
\[ \begin{array} {lcr} 16 & | & 2344 \\ && 146 & rem & 8 \\ && 9 & rem & 2 \\ && 0 & rem & 9 \end{array} \]
Remember the first remainder is the digit at the first position, position zero!
So the converted number reads from bottom up: 928. We can double check that this
is correct by converting the hexadecimal result back into decimal using the power rule.
\[ 9 \cdot 16^2 + 2 \cdot 16^1 + 8 \cdot 16^0 = 2344 \]
Let's do one more hexadecimal number before we try some binary numbers.
The value we are going to convert from decimal to hexadecimal is 43981.
\[ \begin{array} {lcr} 16 & | & 43981 \\ && 2748 & rem & 13 = d \\ && 171 & rem & 12 = c \\ && 10 & rem & 11 = b \\ && 0 & rem & 10 = a \end{array} \]
The decimal value 43981 corresponds thus to the hexadecimal value abcd
Let's try the same for binary numbers now, if we want to convert the decimal value
41 to binary:
\[ \begin{array} {lcr} 2 & | & 41 \\ && 20 & rem & 1 \\ && 10 & rem & 0 \\ && 5 & rem & 0 \\ && 2 & rem & 1 \\ && 1 & rem & 0 \\ && 0 & rem & 1 \end{array} \]
We get the binary number 101001, let's check:
\[ 1 \cdot 2^5 + 0 \cdot 2^4 + 1 \cdot 2^3 + 0 \cdot 2^2 + 0 \cdot 2^1 + 1 \cdot 2^0 = 41 \]
Fantastic, it worked once again!
Conclusion
In this chapter we have learned there were many numeral systems beside the decimal
system we use in our every day life. We've seen why the hexadecimal system uses the
letters a through f and finally we have learned how to convert back and forth
between any numeral system and the decimal system.
#!/bin/bash
set -e

# First we are going to make sure that you understand this is sort of experimental and we will be compiling stuff.

# by default CONTINUE will be false
CONTINUE=false

echo ""
echo "You are about to download, compile, and install stuff on your computer."
echo "Please read through the source script to know what is being done."
echo "Do you want to continue? (y/n)"
read -r response
if [[ $response =~ ^([yY][eE][sS]|[yY])$ ]]; then
  CONTINUE=true
fi

if ! $CONTINUE; then
  # Bail if response is not yes
  echo "Exiting..."
  exit
fi

# check if `brew` is installed
command -v brew >/dev/null 2>&1 || { echo >&2 "It seems you do not have \`brew\` installed. Head on over to http://brew.sh/ to install it."; exit 1; }

export PREFIX="$HOME/opt/"
export TARGET=x86_64-pc-elf
export PATH="$PREFIX/bin:$PATH"

mkdir -p "$HOME/src"
mkdir -p "$PREFIX"

# gmp mpfr libmpc
brew install gmp mpfr libmpc autoconf automake nasm xorriso qemu

# binutils

cd "$HOME/src"

if [ ! -d "binutils-2.27" ]; then
  echo ""
  echo "Installing \`binutils\`"
  echo ""
  curl http://ftp.gnu.org/gnu/binutils/binutils-2.27.tar.gz > binutils-2.27.tar.gz
  tar xfz binutils-2.27.tar.gz
  rm binutils-2.27.tar.gz
  mkdir -p build-binutils
  cd build-binutils
  ../binutils-2.27/configure --target=$TARGET --prefix="$PREFIX" --with-sysroot --disable-nls --disable-werror
  make
  make install
fi

# gcc
cd "$HOME/src"

if [ ! -d "gcc-6.4.0" ]; then
  echo ""
  echo "Installing \`gcc\`"
  echo ""
  curl -L http://ftpmirror.gnu.org/gcc/gcc-6.4.0/gcc-6.4.0.tar.gz > gcc-6.4.0.tar.gz
  tar jxf gcc-6.4.0.tar.gz
  rm gcc-6.4.0.tar.gz
  mkdir -p build-gcc
  cd build-gcc
  ../gcc-6.4.0/configure --target="$TARGET" --prefix="$PREFIX" --disable-nls --enable-languages=c,c++ --without-headers --with-gmp="$(brew --prefix gmp)" --with-mpfr="$(brew --prefix mpfr)" --with-mpc="$(brew --prefix libmpc)"
  make all-gcc
  make all-target-libgcc
  make install-gcc
  make install-target-libgcc
fi

# objconv

cd "$HOME/src"

if [ ! -d "objconv" ]; then
  echo ""
  echo "Installing \`objconv\`"
  echo ""
  curl -L https://www.agner.org/optimize/objconv.zip > objconv.zip
  mkdir -p build-objconv
  unzip objconv.zip -d build-objconv
  cd build-objconv
  unzip source.zip -d src
  g++ -o objconv -O2 src/*.cpp --prefix="$PREFIX"
  cp objconv "$PREFIX/bin"
fi

# grub

cd "$HOME/src"

if [ ! -d "grub" ]; then
  echo ""
  echo "Installing \`grub\`"
  echo ""
  git clone --depth 1 git://git.savannah.gnu.org/grub.git
  cd grub
  sh autogen.sh
  mkdir -p build-grub
  cd build-grub
  ../configure --disable-werror TARGET_CC=$TARGET-gcc TARGET_OBJCOPY=$TARGET-objcopy \
    TARGET_STRIP=$TARGET-strip TARGET_NM=$TARGET-nm TARGET_RANLIB=$TARGET-ranlib --target=$TARGET --prefix="$PREFIX"
  make
  make install
fi